DISCLAIMER
Please use the method with discreet, I am not responsible for any damage caused by the method below:
Problem Description:
There's a issue of using 6Gb Ram on T410/T410i currently that results in screen
black flicker for a few seconds when using Lenovo supplied drivers v8.16.11.8955. It
normally happens on a 64bit Win7 Operating System, as far a I know the 32bit OS does
not have this issue.
The black flash/flicker usually happens when I am resizing any application window, or maximizing windows.
I check the windows event veiw, and I got the following error:
Log Name: Application
Source: Desktop Window Manager
Date: 7/24/2010 7:32:21 PM
Event ID: 9020
Task Category: None
Level: Error
Keywords: Classic
User: N/A
Computer:
Description:
The Desktop Window Manager has encountered a fatal error (0x8007000e)
Error 7/24/2010 7:32:21 PM Desktop Window Manager 9020 None
Solution:
1. Download latest nvidia driver.
http://us.download.nvidia.com/Windows/257.21/257.21_notebook_winvista_win7_64bit_int
ernational_whql.exe
2. Double click it, You need to exit setup application when it launched for the
first time.
3. Modify file NVLT.inf.
Open C:\NVIDIA\DisplayDriver\257.21\WinVista_Win7_64\International\Display\NVLT.inf
file in notepad and change the following line (you can use Ctrl+F to find it)
located in [NVIDIA_SetA_Devices.NTamd64.6.1] section from:
%NVIDIA_DEV.0A6C.01% = Section054, PCI\VEN_10DE&DEV_0A6C&SUBSYS_21C017AA
to
%NVIDIA_DEV.0A6C.01% = Section054, PCI\VEN_10DE&DEV_0A6C&SUBSYS_214217AA
4. Disable Automatic Drive for Graphic card NVIDIA NVS 3100M
4.1 Go to Start–>Search type in gpedit.msc
4.2 Click the file to open the Local Group Policy Editor and show Windows who is in
control!!
4.3 You want to go here: Computer Configuration->Administrative Templates->System-
>Device Installation. Click on the subfolder Device Installation on the left and on
the right side you will see the possible restrictions.
4.4 Right Click on "Prevent Installation of Devices that matches any of the device IDs"
settings" and edit this option, set it on ENABLED.
4.5 Click "Show..." button from "Options" section below:
4.6 Add value "NVIDIA NVS 3100M", then click "OK" to save the value.
4.7 Click "OK" policy editing window.
5. Uninstall existing lenovo nvidia driver, it will ask you to reboot, then reboot.
6. After you startup your computer, revert all you have done in step 4 "Disable
Automatic Drive for Graphic card NVIDIA NVS 3100M", enable it back
7. Install Nvidia Driver.
Go to C:\NVIDIA\DisplayDriver\257.21\WinVista_Win7_64\International\Display
click "setup.exe" to start the installation, Click "yes" to accept the unsigned
driver when you see the unsign driver window.
8. Restart your computer.
9. Done. Everything is ok so far, and even the auto-brightness is working too.
Friday, July 23, 2010

Thursday, April 29, 2010
Configure SSL install CA root certificate to target AD server
Configuring Active Driectory LDAP SSL using Windows 2003 Enterprise CA
Overview
Requirements for an LDAPS certificate
•To enable LDAPS, you must install a certificate that meets the following requirements:
The LDAPS certificate is located in the Local Computer's Personal certificate store (programmatically known as the computer's MY certificate store).
•A private key that matches the certificate is present in the Local Computer's store and is correctly associated with thecertificate. The private key must not have strong private key protection enabled.
•The Enhanced Key Usage extension includes the Server Authentication (1.3.6.1.5.5.7.3.1) object identifier (alsoknown as OID).
•The Active Directory fully qualified domain name of the domain controller (for example, DC01.DOMAIN.COM) must appear in one of the following places:
•The Common Name (CN) in the Subject field.
•DNS entry in the Subject Alternative Name extension.
•The certificate was issued by a CA that the domain controller and the LDAPS clients trust. Trust is established by configuring the clients and the server to trust the root CA to which the issuing CA chains.
•You must use the Schannel cryptographic service provider (CSP) to generate the key.
1. Create the .inf file. Following is an testdomain.inf file that can be used to create the
certificate request.
;----------------- request.inf -----------------
[Version]
Signature="$Windows NT$
[NewRequest]
Subject = "CN=demo.testdomain.com" ; replace with the Full computer name of the DC
KeySpec = 1
KeyLength = 1024
; Can be 1024, 2048, 4096, 8192, or 16384.
; Larger key sizes are more secure, but have
; a greater impact on performance.
Exportable = TRUE
MachineKeySet = TRUE
SMIME = False
PrivateKeyArchive = FALSE
UserProtected = FALSE
UseExistingKeySet = FALSE
ProviderName = "Microsoft RSA SChannel Cryptographic Provider"
ProviderType = 12
RequestType = PKCS10
KeyUsage = 0xa0
[EnhancedKeyUsageExtension]
OID=1.3.6.1.5.5.7.3.1 ; this is for Server Authentication
;-----------------------------------------------
Save it as a file named request.inf, then put this file to folder c:\certreq
2. Create Certificate Request
a). Login to the server that we want to configure SSL
b). Create a directory c:\certreq, and copy the request.inf to this directory.
c). open a command prompt, and type cd c:\certreq
d). Create certificate request,type the following command and then press Enter
certreq -new request.inf request.req
then a new file called request.req is created, this is a Base64-encoded request
file.
Note that make sure issue the command with in directory c:\certreq, otherwise
you won't find request.inf.
if we open request.req, we will see the similar like follows:
-----BEGIN NEW CERTIFICATE REQUEST-----
MIIDrDCCAxUCAQAwga8xCzAJBgNVBAYTAk1ZMS8wLQYDVQQIHiYAVwBpAGwAYQB5
AGEAaABfAFAAZQByAHMAZQBrAHUAdAB1AGEAbjEQMA4GA1UEBxMHUmVkbW9uZDEQ
MA4GA1UEChMHQ29udG9zbzEQMA4GA1UECxMHU2VydmVyczEXMBUGA1UEAxMOdGVz
dGRvbWFpbi5jb20xIDAeBgkqhkiG9w0BCQEWEWFkbWluQGNvbnRvc28uY29tMIGf
MA0GCSqGSIb3DQEBAQUAA4GNADCBiQKBgQCZVBtAuRmcpLgLIzhHBEYtqXIlt6CY
O4hZl+pByrSm5OgeT8ZF3NMhKeFBh4fKAyoAe39PbaStyabTsfYBbDML6pWooQSF
armmhRsnGw/afO+fO8134ko2Gty8E6yLsatX9br9tOoosBT2jsyV4Aizd/rMUfXK
1b0BR0YqBPKi3wIDAQABoIIBujAaBgorBgEEAYI3DQIDMQwWCjUuMi4zNzkwLjIw
SgYJKwYBBAGCNxUUMT0wOwIBAQwTZGVtby50ZXN0ZG9tYWluLmNvbQwYVEVTVERP
TUFJTlxBZG1pbmlzdHJhdG9yDAdjZXJ0cmVxMFAGCSqGSIb3DQEJDjFDMEEwHQYD
VR0OBBYEFJht4ESvBmzKPgeVA5GazOToBQrDMBMGA1UdJQQMMAoGCCsGAQUFBwMB
MAsGA1UdDwQEAwIFoDCB/QYKKwYBBAGCNw0CAjGB7jCB6wIBAR5aAE0AaQBjAHIA
bwBzAG8AZgB0ACAAUgBTAEEAIABTAEMAaABhAG4AbgBlAGwAIABDAHIAeQBwAHQA
bwBnAHIAYQBwAGgAaQBjACAAUAByAG8AdgBpAGQAZQByA4GJAAAAAAAAAAAAAAAA
AAAAAAAAAAAAAAAAAAAAAAAAAAAAAAAAAAAAAAAAAAAAAAAAAAAAAAAAAAAAAAAA
AAAAAAAAAAAAAAAAAAAAAAAAAAAAAAAAAAAAAAAAAAAAAAAAAAAAAAAAAAAAAAAA
AAAAAAAAAAAAAAAAAAAAAAAAAAAAAAAAAAAAAAAwDQYJKoZIhvcNAQEFBQADgYEA
ak5GUMARkeMtWYkJezIuia5WfslHPCBpFmm+YAfg8UUXW2XqCMcMgPNVwMTYWwW/
KHFjQcnl+Qxw0fKKUeSOU03nMctSeO4KjUpknXVbdQxubCNFRtRHo9a6Uk6C6HnZ
dp0M6guDMaP1yYQg+j98ZLf9o/JpBzA1/P+TaNjg4yk=
-----END NEW CERTIFICATE REQUEST-----
Alternatively, You can use the following command to View your request
certutil -dump request.req
you'll get the following result:
-----------------------------------------------------------------
PKCS10 Certificate Request:
Version: 1
Subject:
CN=demo.testdomain.com
Public Key Algorithm:
Algorithm ObjectId: 1.2.840.113549.1.1.1 RSA
Algorithm Parameters:
05 00
Public Key Length: 1024 bits
Public Key: UnusedBits = 0
0000 30 81 89 02 81 81 00 a2 6c c5 27 30 ef 9c bb 3b
0010 d6 9b 76 4c 4b 1b 57 77 5f 2c 67 1f 1d 82 4b ac
0020 5b fa 4b 00 c8 c5 74 24 73 4d ea 74 9b 96 73 a0
0030 45 1f 5d 50 0d 1a ef 7b 26 de f1 06 d3 58 4d f0
0040 09 1c 9a b8 8d d0 04 fc 38 a2 12 60 fe 0c f5 a6
0050 f4 c1 a4 73 3d 6c 5e ff 05 38 9f 19 c5 34 20 14
0060 f8 7d 4a 2a 01 23 00 6d 3a d7 1f d1 62 00 f9 3e
0070 72 d2 d8 ae 06 ad 95 25 2e 10 e6 5e a8 28 ac 4a
0080 c4 c4 c6 f6 87 64 91 02 03 01 00 01
Request Attributes: 4
4 attributes:
Attribute[0]: 1.3.6.1.4.1.311.13.2.3 (OS Version)
Value[0][0]:
5.2.3790.2
Attribute[1]: 1.3.6.1.4.1.311.21.20 (Client Information)
Value[1][0]:
Unknown Attribute type
Client Id: = 1
XECI_XENROLL -- 1
User: TESTDOMAIN\Administrator
Machine: demo.testdomain.com
Process: certreq
Attribute[2]: 1.2.840.113549.1.9.14 (Certificate Extensions)
Value[2][0]:
Unknown Attribute type
Certificate Extensions: 3
2.5.29.14: Flags = 0, Length = 16
Subject Key Identifier
ea 5c 6c 68 e5 9b 23 3b a5 8f ab 06 c9 85 d6 fc d4 6a ff fe
2.5.29.37: Flags = 0, Length = c
Enhanced Key Usage
Server Authentication (1.3.6.1.5.5.7.3.1)
2.5.29.15: Flags = 0, Length = 4
Key Usage
Digital Signature, Key Encipherment (a0)
Attribute[3]: 1.3.6.1.4.1.311.13.2.2 (Enrollment CSP)
Value[3][0]:
Unknown Attribute type
CSP Provider Info
KeySpec = 1
Provider = Microsoft RSA SChannel Cryptographic Provider
Signature: UnusedBits=0
0000 00 00 00 00 00 00 00 00 00 00 00 00 00 00 00 00
Remaining 78 bytes are zero
Signature Algorithm:
Algorithm ObjectId: 1.2.840.113549.1.1.5 sha1RSA
Algorithm Parameters:
05 00
Signature: UnusedBits=0
0000 4d 03 97 19 5e 3a 2f f9 2b 55 6b 40 e7 01 02 be
0010 c1 bf 11 88 c0 30 05 c4 59 4a 88 a9 04 bd 67 64
0020 2c 00 55 68 e4 93 39 d3 f7 9f 68 96 d4 8d 3d 4c
0030 c0 18 ae 08 6c 4a a3 c7 b4 33 97 3a a4 b2 a9 08
0040 f3 a9 a8 50 00 ae fc d2 e6 27 6c c8 85 92 e7 4b
0050 f0 3f f0 3a ad c1 12 23 39 85 a8 1c 4a 05 64 bf
0060 80 70 2f a1 8c f8 98 95 45 54 5c d2 9c 92 e9 f4
0070 0b 79 ad 0a a3 69 23 c1 78 95 b9 d3 23 5c 91 3c
Signature matches Public Key
Key Id Hash(sha1): ea 5c 6c 68 e5 9b 23 3b a5 8f ab 06 c9 85 d6 fc d4 6a ff fe
CertUtil: -dump command completed successfully.
---------------------------------------------------------------------------
Check the subject must be : CN=demo.testdomain.com
3.Submit the request to a CA.
We are going to submit the request to a Microsoft Windows 2003 Enterprise CA,
that we have installed in another server.
we still need command certreq.exe to complete this step.
a). Login to the server has CA installed
b). create a directory c:\certreq, and copy request.req to this directory
c). open a command prompt, and type cd c:\certreq
d). submit the certificate request using the command below:
certreq -submit -attrib "Certificate Template: DomainControllerAuthentication" request.req
You will be prompt to select a certificate authority, Click OK
If you see the following error:
-------------------------------------------------------------------------------------------
Certificate not issued (Denied) Denied by Policy Module The DNS name is unavaila
ble and cannot be added to the Subject Alternate name. 0x8009480f (-2146875377)
Certificate Request Processor: The DNS name is unavailable and cannot be added t
o the Subject Alternate name. 0x8009480f (-2146875377)
Denied by Policy Module
-------------------------------------------------------------------------------------------
Solution to this issue.
1). Click start->run, then key in command mmc
2). Click File in the mmc console, then select Add/Remove Snap-in...
3). Click Add... buton in the Add/Remove Snap dialog
4). Select Certificate Templates, Click Add
5). Close the window in step 4) available standalone snap-in window.
6). You will see "Certificate Templates", Click OK.
7). Find "Domain Controller Authentication" in "Console Root\Certificate Templates"
8). Double click "Domain Controller Authentication" to open it.
9). You can change the validity of a certificate in "Domain Controller Authentication
Properties" window,change it to 10, meaning this certificate will be valid for 10 years.
10). Select the "Subject Name" tab, then select "Supply in the request", click Apply
11). Select the "Security" tab, select "Authenticated Users", in the permissions for
authenticated users section, make sure "Allow" for Enroll. Click OK to close "Domain
Controller Authentication Properties" window.
12)
Re-submit the certificate request using the follwing command:
certreq -submit -attrib "Certificate Template: DomainControllerAuthentication" request.req
Note that make sure you are in directory c:\certreq
It will ask for which CA to use, select the first in the dialog.
Click OK
e). if no error was prompted in step d), certreq util will ask to to save the signed
certificate,
save it to desktop, named demo.testdomain.com.cer
-----------------------------------------------------------------------------
Note that for Windows 2000, Use the command below:
certreq -submit -attrib "CertificateTemplate: DomainController" request.req
-------------------------------------------------------------------------
4. Accept the certificate.
a). Login to the AD server that you want to install server certificate
b). copy the newly issued certificate to directory c:\certreq
c). open a command prompt, and navigate to c:\certreq
d). accept the server certificate, using the command below:
certreq -accept demo.testdomain.com.cer
if no error prompt that means we have installed server certificate successfully.
But the SSL communication is not yet enable, that's why we need next step:
5. Install CA root certificate to target AD server.
a). Copy CA root certificate "PortaldomCA.cer" to target AD server, directory c:\certreq
b). Click start->run, then key in command mmc
c). Click File in the mmc console, then select Add/Remove Snap-in...
d). Click Add... buton in the Add/Remove Snap dialog
e). Select Certificates from the available standalone snap-ins window, click add
f). Select Computer account from Certificate snap-in window, Click Finish.
g). close the window in step d) available standalone snap-in window.
h). "You'll see Certificate (Local Computer)" in the Add/Remove Snap-in Dialog,Click OK
i). Un-folder "Certificate (Local Computer)", then Maximize the Console Root to have
a better view.
j). Select "Trusted Root Certificate Authorities" -> "All Tasks" -> "Import..."
k). A certificate Import wizard will be prompted, Click Next>
l). Navigate to c:\certreq, and select PortaldomCA.cer, then click Open.
m). You'll see the root certificate path has been selected, click Next>
n). In the certificate store dialog, keep the default selection, then click Next>
o). Click Finish in the "Completing the Certificate Import Wizard" Dialog. Congratulations, you have successfully imported Root certificate.
p). Navigate to Personal -> Certificates, you'll see the certificate "demo.testdomain.com"
r). Double click to open it.
notice that on the bottom of the certificate window, you can see "You have a private key that corresponds to this certificate", this proves we have successfully installed certificate in step 4.
s). Click tab "Certificate Path", check on the certificate status, you'll see "This
certificate is OK.", meaning server certificate has been installed, and you are ready to communicate with this AD server via SSL.
Note there is no need to restart server.
Overview
Requirements for an LDAPS certificate
•To enable LDAPS, you must install a certificate that meets the following requirements:
The LDAPS certificate is located in the Local Computer's Personal certificate store (programmatically known as the computer's MY certificate store).
•A private key that matches the certificate is present in the Local Computer's store and is correctly associated with thecertificate. The private key must not have strong private key protection enabled.
•The Enhanced Key Usage extension includes the Server Authentication (1.3.6.1.5.5.7.3.1) object identifier (alsoknown as OID).
•The Active Directory fully qualified domain name of the domain controller (for example, DC01.DOMAIN.COM) must appear in one of the following places:
•The Common Name (CN) in the Subject field.
•DNS entry in the Subject Alternative Name extension.
•The certificate was issued by a CA that the domain controller and the LDAPS clients trust. Trust is established by configuring the clients and the server to trust the root CA to which the issuing CA chains.
•You must use the Schannel cryptographic service provider (CSP) to generate the key.
1. Create the .inf file. Following is an testdomain.inf file that can be used to create the
certificate request.
;----------------- request.inf -----------------
[Version]
Signature="$Windows NT$
[NewRequest]
Subject = "CN=demo.testdomain.com" ; replace with the Full computer name of the DC
KeySpec = 1
KeyLength = 1024
; Can be 1024, 2048, 4096, 8192, or 16384.
; Larger key sizes are more secure, but have
; a greater impact on performance.
Exportable = TRUE
MachineKeySet = TRUE
SMIME = False
PrivateKeyArchive = FALSE
UserProtected = FALSE
UseExistingKeySet = FALSE
ProviderName = "Microsoft RSA SChannel Cryptographic Provider"
ProviderType = 12
RequestType = PKCS10
KeyUsage = 0xa0
[EnhancedKeyUsageExtension]
OID=1.3.6.1.5.5.7.3.1 ; this is for Server Authentication
;-----------------------------------------------
Save it as a file named request.inf, then put this file to folder c:\certreq
2. Create Certificate Request
a). Login to the server that we want to configure SSL
b). Create a directory c:\certreq, and copy the request.inf to this directory.
c). open a command prompt, and type cd c:\certreq
d). Create certificate request,type the following command and then press Enter
certreq -new request.inf request.req
then a new file called request.req is created, this is a Base64-encoded request
file.
Note that make sure issue the command with in directory c:\certreq, otherwise
you won't find request.inf.
if we open request.req, we will see the similar like follows:
-----BEGIN NEW CERTIFICATE REQUEST-----
MIIDrDCCAxUCAQAwga8xCzAJBgNVBAYTAk1ZMS8wLQYDVQQIHiYAVwBpAGwAYQB5
AGEAaABfAFAAZQByAHMAZQBrAHUAdAB1AGEAbjEQMA4GA1UEBxMHUmVkbW9uZDEQ
MA4GA1UEChMHQ29udG9zbzEQMA4GA1UECxMHU2VydmVyczEXMBUGA1UEAxMOdGVz
dGRvbWFpbi5jb20xIDAeBgkqhkiG9w0BCQEWEWFkbWluQGNvbnRvc28uY29tMIGf
MA0GCSqGSIb3DQEBAQUAA4GNADCBiQKBgQCZVBtAuRmcpLgLIzhHBEYtqXIlt6CY
O4hZl+pByrSm5OgeT8ZF3NMhKeFBh4fKAyoAe39PbaStyabTsfYBbDML6pWooQSF
armmhRsnGw/afO+fO8134ko2Gty8E6yLsatX9br9tOoosBT2jsyV4Aizd/rMUfXK
1b0BR0YqBPKi3wIDAQABoIIBujAaBgorBgEEAYI3DQIDMQwWCjUuMi4zNzkwLjIw
SgYJKwYBBAGCNxUUMT0wOwIBAQwTZGVtby50ZXN0ZG9tYWluLmNvbQwYVEVTVERP
TUFJTlxBZG1pbmlzdHJhdG9yDAdjZXJ0cmVxMFAGCSqGSIb3DQEJDjFDMEEwHQYD
VR0OBBYEFJht4ESvBmzKPgeVA5GazOToBQrDMBMGA1UdJQQMMAoGCCsGAQUFBwMB
MAsGA1UdDwQEAwIFoDCB/QYKKwYBBAGCNw0CAjGB7jCB6wIBAR5aAE0AaQBjAHIA
bwBzAG8AZgB0ACAAUgBTAEEAIABTAEMAaABhAG4AbgBlAGwAIABDAHIAeQBwAHQA
bwBnAHIAYQBwAGgAaQBjACAAUAByAG8AdgBpAGQAZQByA4GJAAAAAAAAAAAAAAAA
AAAAAAAAAAAAAAAAAAAAAAAAAAAAAAAAAAAAAAAAAAAAAAAAAAAAAAAAAAAAAAAA
AAAAAAAAAAAAAAAAAAAAAAAAAAAAAAAAAAAAAAAAAAAAAAAAAAAAAAAAAAAAAAAA
AAAAAAAAAAAAAAAAAAAAAAAAAAAAAAAAAAAAAAAwDQYJKoZIhvcNAQEFBQADgYEA
ak5GUMARkeMtWYkJezIuia5WfslHPCBpFmm+YAfg8UUXW2XqCMcMgPNVwMTYWwW/
KHFjQcnl+Qxw0fKKUeSOU03nMctSeO4KjUpknXVbdQxubCNFRtRHo9a6Uk6C6HnZ
dp0M6guDMaP1yYQg+j98ZLf9o/JpBzA1/P+TaNjg4yk=
-----END NEW CERTIFICATE REQUEST-----
Alternatively, You can use the following command to View your request
certutil -dump request.req
you'll get the following result:
-----------------------------------------------------------------
PKCS10 Certificate Request:
Version: 1
Subject:
CN=demo.testdomain.com
Public Key Algorithm:
Algorithm ObjectId: 1.2.840.113549.1.1.1 RSA
Algorithm Parameters:
05 00
Public Key Length: 1024 bits
Public Key: UnusedBits = 0
0000 30 81 89 02 81 81 00 a2 6c c5 27 30 ef 9c bb 3b
0010 d6 9b 76 4c 4b 1b 57 77 5f 2c 67 1f 1d 82 4b ac
0020 5b fa 4b 00 c8 c5 74 24 73 4d ea 74 9b 96 73 a0
0030 45 1f 5d 50 0d 1a ef 7b 26 de f1 06 d3 58 4d f0
0040 09 1c 9a b8 8d d0 04 fc 38 a2 12 60 fe 0c f5 a6
0050 f4 c1 a4 73 3d 6c 5e ff 05 38 9f 19 c5 34 20 14
0060 f8 7d 4a 2a 01 23 00 6d 3a d7 1f d1 62 00 f9 3e
0070 72 d2 d8 ae 06 ad 95 25 2e 10 e6 5e a8 28 ac 4a
0080 c4 c4 c6 f6 87 64 91 02 03 01 00 01
Request Attributes: 4
4 attributes:
Attribute[0]: 1.3.6.1.4.1.311.13.2.3 (OS Version)
Value[0][0]:
5.2.3790.2
Attribute[1]: 1.3.6.1.4.1.311.21.20 (Client Information)
Value[1][0]:
Unknown Attribute type
Client Id: = 1
XECI_XENROLL -- 1
User: TESTDOMAIN\Administrator
Machine: demo.testdomain.com
Process: certreq
Attribute[2]: 1.2.840.113549.1.9.14 (Certificate Extensions)
Value[2][0]:
Unknown Attribute type
Certificate Extensions: 3
2.5.29.14: Flags = 0, Length = 16
Subject Key Identifier
ea 5c 6c 68 e5 9b 23 3b a5 8f ab 06 c9 85 d6 fc d4 6a ff fe
2.5.29.37: Flags = 0, Length = c
Enhanced Key Usage
Server Authentication (1.3.6.1.5.5.7.3.1)
2.5.29.15: Flags = 0, Length = 4
Key Usage
Digital Signature, Key Encipherment (a0)
Attribute[3]: 1.3.6.1.4.1.311.13.2.2 (Enrollment CSP)
Value[3][0]:
Unknown Attribute type
CSP Provider Info
KeySpec = 1
Provider = Microsoft RSA SChannel Cryptographic Provider
Signature: UnusedBits=0
0000 00 00 00 00 00 00 00 00 00 00 00 00 00 00 00 00
Remaining 78 bytes are zero
Signature Algorithm:
Algorithm ObjectId: 1.2.840.113549.1.1.5 sha1RSA
Algorithm Parameters:
05 00
Signature: UnusedBits=0
0000 4d 03 97 19 5e 3a 2f f9 2b 55 6b 40 e7 01 02 be
0010 c1 bf 11 88 c0 30 05 c4 59 4a 88 a9 04 bd 67 64
0020 2c 00 55 68 e4 93 39 d3 f7 9f 68 96 d4 8d 3d 4c
0030 c0 18 ae 08 6c 4a a3 c7 b4 33 97 3a a4 b2 a9 08
0040 f3 a9 a8 50 00 ae fc d2 e6 27 6c c8 85 92 e7 4b
0050 f0 3f f0 3a ad c1 12 23 39 85 a8 1c 4a 05 64 bf
0060 80 70 2f a1 8c f8 98 95 45 54 5c d2 9c 92 e9 f4
0070 0b 79 ad 0a a3 69 23 c1 78 95 b9 d3 23 5c 91 3c
Signature matches Public Key
Key Id Hash(sha1): ea 5c 6c 68 e5 9b 23 3b a5 8f ab 06 c9 85 d6 fc d4 6a ff fe
CertUtil: -dump command completed successfully.
---------------------------------------------------------------------------
Check the subject must be : CN=demo.testdomain.com
3.Submit the request to a CA.
We are going to submit the request to a Microsoft Windows 2003 Enterprise CA,
that we have installed in another server.
we still need command certreq.exe to complete this step.
a). Login to the server has CA installed
b). create a directory c:\certreq, and copy request.req to this directory
c). open a command prompt, and type cd c:\certreq
d). submit the certificate request using the command below:
certreq -submit -attrib "Certificate Template: DomainControllerAuthentication" request.req
You will be prompt to select a certificate authority, Click OK
If you see the following error:
-------------------------------------------------------------------------------------------
Certificate not issued (Denied) Denied by Policy Module The DNS name is unavaila
ble and cannot be added to the Subject Alternate name. 0x8009480f (-2146875377)
Certificate Request Processor: The DNS name is unavailable and cannot be added t
o the Subject Alternate name. 0x8009480f (-2146875377)
Denied by Policy Module
-------------------------------------------------------------------------------------------
Solution to this issue.
1). Click start->run, then key in command mmc
2). Click File in the mmc console, then select Add/Remove Snap-in...
3). Click Add... buton in the Add/Remove Snap dialog
4). Select Certificate Templates, Click Add
5). Close the window in step 4) available standalone snap-in window.
6). You will see "Certificate Templates", Click OK.
7). Find "Domain Controller Authentication" in "Console Root\Certificate Templates"
8). Double click "Domain Controller Authentication" to open it.
9). You can change the validity of a certificate in "Domain Controller Authentication
Properties" window,change it to 10, meaning this certificate will be valid for 10 years.
10). Select the "Subject Name" tab, then select "Supply in the request", click Apply
11). Select the "Security" tab, select "Authenticated Users", in the permissions for
authenticated users section, make sure "Allow" for Enroll. Click OK to close "Domain
Controller Authentication Properties" window.
12)
Re-submit the certificate request using the follwing command:
certreq -submit -attrib "Certificate Template: DomainControllerAuthentication" request.req
Note that make sure you are in directory c:\certreq
It will ask for which CA to use, select the first in the dialog.
Click OK
e). if no error was prompted in step d), certreq util will ask to to save the signed
certificate,
save it to desktop, named demo.testdomain.com.cer
-----------------------------------------------------------------------------
Note that for Windows 2000, Use the command below:
certreq -submit -attrib "CertificateTemplate: DomainController" request.req
-------------------------------------------------------------------------
4. Accept the certificate.
a). Login to the AD server that you want to install server certificate
b). copy the newly issued certificate to directory c:\certreq
c). open a command prompt, and navigate to c:\certreq
d). accept the server certificate, using the command below:
certreq -accept demo.testdomain.com.cer
if no error prompt that means we have installed server certificate successfully.
But the SSL communication is not yet enable, that's why we need next step:
5. Install CA root certificate to target AD server.
a). Copy CA root certificate "PortaldomCA.cer" to target AD server, directory c:\certreq
b). Click start->run, then key in command mmc
c). Click File in the mmc console, then select Add/Remove Snap-in...
d). Click Add... buton in the Add/Remove Snap dialog
e). Select Certificates from the available standalone snap-ins window, click add
f). Select Computer account from Certificate snap-in window, Click Finish.
g). close the window in step d) available standalone snap-in window.
h). "You'll see Certificate (Local Computer)" in the Add/Remove Snap-in Dialog,Click OK
i). Un-folder "Certificate (Local Computer)", then Maximize the Console Root to have
a better view.
j). Select "Trusted Root Certificate Authorities" -> "All Tasks" -> "Import..."
k). A certificate Import wizard will be prompted, Click Next>
l). Navigate to c:\certreq, and select PortaldomCA.cer, then click Open.
m). You'll see the root certificate path has been selected, click Next>
n). In the certificate store dialog, keep the default selection, then click Next>
o). Click Finish in the "Completing the Certificate Import Wizard" Dialog. Congratulations, you have successfully imported Root certificate.
p). Navigate to Personal -> Certificates, you'll see the certificate "demo.testdomain.com"
r). Double click to open it.
notice that on the bottom of the certificate window, you can see "You have a private key that corresponds to this certificate", this proves we have successfully installed certificate in step 4.
s). Click tab "Certificate Path", check on the certificate status, you'll see "This
certificate is OK.", meaning server certificate has been installed, and you are ready to communicate with this AD server via SSL.
Note there is no need to restart server.
Certificate not issued (Denied) Denied by Policy Module The DNS name is unavaila ble and cannot be added to the Subject Alternate name. 0x8009480f
I am configuring Active Driectory LDAP SSL using Windows 2003 Enterprise CA, however,
I received the following error while I submit my certificate signing request to Microsoft 2003 Enterprise CA
-----------------------------------------------------------------------
Certificate not issued (Denied) Denied by Policy Module The DNS name is unavaila
ble and cannot be added to the Subject Alternate name. 0x8009480f (-2146875377)
Certificate Request Processor: The DNS name is unavailable and cannot be added t
o the Subject Alternate name. 0x8009480f (-2146875377)
Denied by Policy Module
-----------------------------------------------------------------------
Solution to this issue.
1). Click start->run, then key in command mmc
2). Click File in the mmc console, then select Add/Remove Snap-in...
3). Click Add... buton in the Add/Remove Snap dialog
4). Select Certificate Templates, Click Add
5). Close the window in step 4) available standalone snap-in window.
6). You will see "Certificate Templates", Click OK.
7). Find "Domain Controller Authentication" in "Console Root\Certificate Templates"
8). Double click "Domain Controller Authentication" to open it.
9). You can change the validity of a certificate in "Domain Controller Authentication
Properties" window,change it to 10, meaning this certificate will be valid for 10 years.
10). Select the "Subject Name" tab, then select "Supply in the request", click Apply
11). Select the "Security" tab, select "Authenticated Users", in the permissions for
authenticated users section, make sure "Allow" for Enroll. Click OK to close "Domain
Controller Authentication Properties" window.
12)
Re-submit the certificate request using the follwing command:
certreq -submit -attrib "Certificate Template: DomainControllerAuthentication" request.req
I received the following error while I submit my certificate signing request to Microsoft 2003 Enterprise CA
-----------------------------------------------------------------------
Certificate not issued (Denied) Denied by Policy Module The DNS name is unavaila
ble and cannot be added to the Subject Alternate name. 0x8009480f (-2146875377)
Certificate Request Processor: The DNS name is unavailable and cannot be added t
o the Subject Alternate name. 0x8009480f (-2146875377)
Denied by Policy Module
-----------------------------------------------------------------------
Solution to this issue.
1). Click start->run, then key in command mmc
2). Click File in the mmc console, then select Add/Remove Snap-in...
3). Click Add... buton in the Add/Remove Snap dialog
4). Select Certificate Templates, Click Add
5). Close the window in step 4) available standalone snap-in window.
6). You will see "Certificate Templates", Click OK.
7). Find "Domain Controller Authentication" in "Console Root\Certificate Templates"
8). Double click "Domain Controller Authentication" to open it.
9). You can change the validity of a certificate in "Domain Controller Authentication
Properties" window,change it to 10, meaning this certificate will be valid for 10 years.
10). Select the "Subject Name" tab, then select "Supply in the request", click Apply
11). Select the "Security" tab, select "Authenticated Users", in the permissions for
authenticated users section, make sure "Allow" for Enroll. Click OK to close "Domain
Controller Authentication Properties" window.
12)
Re-submit the certificate request using the follwing command:
certreq -submit -attrib "Certificate Template: DomainControllerAuthentication" request.req
The request contains no certificate template information. 0x80094801
I am configuring Active Driectory LDAP SSL using Windows 2003 Enterprise CA, however,
I received the following error while I submit my certificate signing request to Microsoft 2003 Enterprise CA
===================================================================================
The request contains no certificate template information. 0x80094801 (-2146875391)
Denied by Policy Module 0x80094801, the request does not contain a certificate template
extension or the Certificate Template request attribute.
==================================================================================
I checked the Microsoft Helps, got the following explanation:
==============================================================================
The message indicates that there is no certificate template information in the request.
However, there is no option in the Certification Authority MMC snap-in to select a certificate template.
Note Stand-alone CAs do not use certificate templates. Therefore, this issue occurs only when you use the Certification Authority MMC snap-in to request a certificate from an enterprise CA.
=================================================================================
Solution:
Perfom the following steps:
1). Start->Administrative Tools->Certificate Authority
2). Expand the intended certificate authority node on the left pane.
3). Select "Certificate Templates", Check if the following templates available:
* Domain Controller Authentication -------- For Windows 2003
* Domain Controller ----------------------- For Windows 2000
If they are not there, perform step 4)
4). Highlight "Certificate Tempates" on the left pane, and right click it, select
"new", then click "certificate to issue".
5). An "Enable Certificate Templates" dialog popup, Press "Ctrl" key and select the following
Certificate Templates, then click "OK".
* Domain Controller Authentication
* Domain Controller
6). Restart the certificate Authority by select it on the left pane, then click the black
square on the tool bar to stop it, then click the black triangle to start it.
7). Congratulations, you have enabled the certificate template needed to issue Domain
Certificate.
I received the following error while I submit my certificate signing request to Microsoft 2003 Enterprise CA
===================================================================================
The request contains no certificate template information. 0x80094801 (-2146875391)
Denied by Policy Module 0x80094801, the request does not contain a certificate template
extension or the Certificate Template request attribute.
==================================================================================
I checked the Microsoft Helps, got the following explanation:
==============================================================================
The message indicates that there is no certificate template information in the request.
However, there is no option in the Certification Authority MMC snap-in to select a certificate template.
Note Stand-alone CAs do not use certificate templates. Therefore, this issue occurs only when you use the Certification Authority MMC snap-in to request a certificate from an enterprise CA.
=================================================================================
Solution:
Perfom the following steps:
1). Start->Administrative Tools->Certificate Authority
2). Expand the intended certificate authority node on the left pane.
3). Select "Certificate Templates", Check if the following templates available:
* Domain Controller Authentication -------- For Windows 2003
* Domain Controller ----------------------- For Windows 2000
If they are not there, perform step 4)
4). Highlight "Certificate Tempates" on the left pane, and right click it, select
"new", then click "certificate to issue".
5). An "Enable Certificate Templates" dialog popup, Press "Ctrl" key and select the following
Certificate Templates, then click "OK".
* Domain Controller Authentication
* Domain Controller
6). Restart the certificate Authority by select it on the left pane, then click the black
square on the tool bar to stop it, then click the black triangle to start it.
7). Congratulations, you have enabled the certificate template needed to issue Domain
Certificate.
Wednesday, January 20, 2010
Test SyntaxHighlighter
Navigate to Blogger -> Layout -> Edit HTML to Edit Template of Your Google Blog.
Insert the follwing code above </head> or </body>
Code:
Samples:
1. Html Code
Code:
<pre name="code" class="html">
<!-- code here -->
</pre>
Result:
2. Python Code
Code:
<pre name="code" class="python">
<!-- code here -->
</pre>
Result:
3. Java Code
Code:
<pre name="code" class="java">
import java.io.Serializable;
class Dog implements Serializable {
 private Collar theCollar;
 private int dogSize;
 public Dog(Collar collar, int size) {
  theCollar = collar;
  dogSize = size;
 }
 public Collar getCollar() { return theCollar; }
}

class Collar implements Serializable {
 private int collarSize;
 public Collar( int size ) { collarSize = size; }
 public int getCollarSize() {return collarSize; }
}
</pre>
Result:
For lates information about SyntaxHighlighter, please refer to: http://alexgorbatchev.com/wiki/SyntaxHighlighter
Insert the follwing code above </head> or </body>
Code:
<link href='http://alexgorbatchev.com/pub/sh/1.5.1/styles/SyntaxHighlighter.css' rel='stylesheet' type='text/css'/>
Samples:
1. Html Code
Code:
<pre name="code" class="html">
<!-- code here -->
</pre>
Result:
2. Python Code
Code:
<pre name="code" class="python">
<!-- code here -->
</pre>
Result:
# code here
3. Java Code
Code:
<pre name="code" class="java">
import java.io.Serializable;
class Dog implements Serializable {
private Collar theCollar;
private int dogSize;
public Dog(Collar collar, int size) {
theCollar = collar;
dogSize = size;
}
public Collar getCollar() { return theCollar; }
}
class Collar implements Serializable {
private int collarSize;
public Collar( int size ) { collarSize = size; }
public int getCollarSize() {return collarSize; }
}
</pre>
Result:
import java.io.Serializable;
class Dog implements Serializable {
private Collar theCollar;
private int dogSize;
public Dog(Collar collar, int size) {
theCollar = collar;
dogSize = size;
}
public Collar getCollar() { return theCollar; }
}
class Collar implements Serializable {
private int collarSize;
public Collar( int size ) { collarSize = size; }
public int getCollarSize() {return collarSize; }
}
For lates information about SyntaxHighlighter, please refer to: http://alexgorbatchev.com/wiki/SyntaxHighlighter
Tuesday, January 19, 2010
Migrate OIM Database from one server to another using dump file
Let's say we want to move OIM Server A's data to Server B.
A and B have both configured and running its own application
properly, but somehow we need to discard B server's data, and
replace it with A server's data.
1. The following files needs to be copy from A server to B Server
OIM_HOME/xellerate/config/...
a). .xldatabasekey
b). .xlkeystore
c). configkey.key
2. Make a full dump of server A
Use the followng script:
DBLoginID=SYSTEM
DBLoginPassword=admin123
Backup_Home="/oracle/app/oracle/DatabaseBackup/OIM_UAT"
BackupOwner="xladm_uat"
BackupComment="_backupComment"
BackupFileName="/xladm_20100119_0338${BackupComment}.dmp"
exp ${DBLoginID}/${DBLoginPassword}@orcl owner=${BackupOwner} file=${Backup_Home ${BackupFileName}
------------- xladm_uat is the schema used by A server.
3. Import the dump to B Server
Use the following script:
DBLoginID=SYSTEM
DBLoginPassword=admin123
Backup_Home="/oracle/app/oracle/DatabaseBackup/OIM_UAT" RestoreFileName="/backupFileName.dmp"
imp ${DBLoginID}/${DBLoginPassword}@orcl fromuser=xladm_uat touser=xladm file=${Backup_Home}${RestoreFileName}
note: xladm is the schema used by B server
4). Edit xlconfig.xml file on B server.
a) Open B server's xlconfig.xml file, and replace all the password
string with the one in A server's xlconfig.xml.
The following section need to be edited:
(1) configuration for DB connection
<DirectDB>
<driver>oracle.jdbc.driver.OracleDriver</driver>
<url>jdbc:oracle:thin:@192.168.19.38:1521:orcl</url>
<username>xladm</username>
<password encrypted="true">HjHsMmK0gQqrfyHKRCEfEg==</password>
<maxconnections>5</maxconnections>
<idletimeout>360</idletimeout>
<checkouttimeout>1200</checkouttimeout>
<maxcheckout>1000</maxcheckout>
</DirectDB>
(2) configuration for PKI
<Security>
<XLPKIProvider>
<KeyStore>
<Location>.xlkeystore</Location>
<Password encrypted="true">VPqfO+o717lgbuSpumj3+g==</Password>
<Type>JKS</Type>
<Provider>sun.security.provider.Sun</Provider>
</KeyStore>
<Keys>
<PrivateKey>
<Alias>xell</Alias>
<Password encrypted="true">VPqfO+o717lgbuSpumj3+g==</Password>
</PrivateKey>
</Keys>
<SignatureAlgorithm>SHA1withDSA</SignatureAlgorithm>
<SignatureProvider>sun.security.provider.Sun</SignatureProvider>
<VerifySigner>true</VerifySigner>
</XLPKIProvider>
<XLSymmetricProvider>
<KeyStore>
<Location>.xldatabasekey</Location>
<Password encrypted="true">VPqfO+o717lgbuSpumj3+g==</Password>
<Type>JCEKS</Type>
<Provider>com.sun.crypto.provider.SunJCE</Provider>
</KeyStore>
<Keys>
<DBSecretKey>
<Alias>DataBaseKey</Alias>
<Password encrypted="true">VPqfO+o717lgbuSpumj3+g==</Password>
<BlockMode>CBC</BlockMode>
</DBSecretKey>
<JMSKey>
<Alias>DataBaseKey</Alias>
<Password encrypted="true">VPqfO+o717lgbuSpumj3+g==</Password>
<BlockMode>CBC</BlockMode>
</JMSKey>
</Keys>
</XLSymmetricProvider>
</Security>
(3) Configuration for remote manager
<RMSecurity>
<KeyStore>
<Location>.xlkeystore</Location>
<Password encrypted="true">VPqfO+o717lgbuSpumj3+g==</Password>
<Type>JKS</Type>
<Provider>sun.security.provider.Sun</Provider>
</KeyStore>
<TrustStore>
<Location>.xlkeystore</Location>
<Password encrypted="true">VPqfO+o717lgbuSpumj3+g==</Password>
<Type>JKS</Type>
<Provider>sun.security.provider.Sun</Provider>
</TrustStore>
<RMIOverSSL>true</RMIOverSSL>
<SSLPort>44434</SSLPort>
<SSLContextAlgorithm>TLS</SSLContextAlgorithm>
<KeyManagerFactory>SunX509</KeyManagerFactory>
<BindingPort>44444</BindingPort>
<ServiceName>RManager</ServiceName>
<LoggerConfigFilePath>D:/Proj/OIM/910x/xlserver/xellerate/config/log.properties</LoggerConfigFilePath>
<ClientAuth>false</ClientAuth>
</RMSecurity>
5. Config B server's Design console
a). Duplicate the whole Design Console Folder of A server, called
xlclient2.
b). Copy all the files in directory /xlclient/Config/ from B
server's original design console folder to the newly duplicated one
- xlclient2
6) Start OIM Server
7) Start Design Console
A and B have both configured and running its own application
properly, but somehow we need to discard B server's data, and
replace it with A server's data.
1. The following files needs to be copy from A server to B Server
OIM_HOME/xellerate/config/...
a). .xldatabasekey
b). .xlkeystore
c). configkey.key
2. Make a full dump of server A
Use the followng script:
DBLoginID=SYSTEM
DBLoginPassword=admin123
Backup_Home="/oracle/app/oracle/DatabaseBackup/OIM_UAT"
BackupOwner="xladm_uat"
BackupComment="_backupComment"
BackupFileName="/xladm_20100119_0338${BackupComment}.dmp"
exp ${DBLoginID}/${DBLoginPassword}@orcl owner=${BackupOwner} file=${Backup_Home ${BackupFileName}
------------- xladm_uat is the schema used by A server.
3. Import the dump to B Server
Use the following script:
DBLoginID=SYSTEM
DBLoginPassword=admin123
Backup_Home="/oracle/app/oracle/DatabaseBackup/OIM_UAT" RestoreFileName="/backupFileName.dmp"
imp ${DBLoginID}/${DBLoginPassword}@orcl fromuser=xladm_uat touser=xladm file=${Backup_Home}${RestoreFileName}
note: xladm is the schema used by B server
4). Edit xlconfig.xml file on B server.
a) Open B server's xlconfig.xml file, and replace all the password
string with the one in A server's xlconfig.xml.
The following section need to be edited:
(1) configuration for DB connection
<DirectDB>
<driver>oracle.jdbc.driver.OracleDriver</driver>
<url>jdbc:oracle:thin:@192.168.19.38:1521:orcl</url>
<username>xladm</username>
<password encrypted="true">HjHsMmK0gQqrfyHKRCEfEg==</password>
<maxconnections>5</maxconnections>
<idletimeout>360</idletimeout>
<checkouttimeout>1200</checkouttimeout>
<maxcheckout>1000</maxcheckout>
</DirectDB>
(2) configuration for PKI
<Security>
<XLPKIProvider>
<KeyStore>
<Location>.xlkeystore</Location>
<Password encrypted="true">VPqfO+o717lgbuSpumj3+g==</Password>
<Type>JKS</Type>
<Provider>sun.security.provider.Sun</Provider>
</KeyStore>
<Keys>
<PrivateKey>
<Alias>xell</Alias>
<Password encrypted="true">VPqfO+o717lgbuSpumj3+g==</Password>
</PrivateKey>
</Keys>
<SignatureAlgorithm>SHA1withDSA</SignatureAlgorithm>
<SignatureProvider>sun.security.provider.Sun</SignatureProvider>
<VerifySigner>true</VerifySigner>
</XLPKIProvider>
<XLSymmetricProvider>
<KeyStore>
<Location>.xldatabasekey</Location>
<Password encrypted="true">VPqfO+o717lgbuSpumj3+g==</Password>
<Type>JCEKS</Type>
<Provider>com.sun.crypto.provider.SunJCE</Provider>
</KeyStore>
<Keys>
<DBSecretKey>
<Alias>DataBaseKey</Alias>
<Password encrypted="true">VPqfO+o717lgbuSpumj3+g==</Password>
<BlockMode>CBC</BlockMode>
</DBSecretKey>
<JMSKey>
<Alias>DataBaseKey</Alias>
<Password encrypted="true">VPqfO+o717lgbuSpumj3+g==</Password>
<BlockMode>CBC</BlockMode>
</JMSKey>
</Keys>
</XLSymmetricProvider>
</Security>
(3) Configuration for remote manager
<RMSecurity>
<KeyStore>
<Location>.xlkeystore</Location>
<Password encrypted="true">VPqfO+o717lgbuSpumj3+g==</Password>
<Type>JKS</Type>
<Provider>sun.security.provider.Sun</Provider>
</KeyStore>
<TrustStore>
<Location>.xlkeystore</Location>
<Password encrypted="true">VPqfO+o717lgbuSpumj3+g==</Password>
<Type>JKS</Type>
<Provider>sun.security.provider.Sun</Provider>
</TrustStore>
<RMIOverSSL>true</RMIOverSSL>
<SSLPort>44434</SSLPort>
<SSLContextAlgorithm>TLS</SSLContextAlgorithm>
<KeyManagerFactory>SunX509</KeyManagerFactory>
<BindingPort>44444</BindingPort>
<ServiceName>RManager</ServiceName>
<LoggerConfigFilePath>D:/Proj/OIM/910x/xlserver/xellerate/config/log.properties</LoggerConfigFilePath>
<ClientAuth>false</ClientAuth>
</RMSecurity>
5. Config B server's Design console
a). Duplicate the whole Design Console Folder of A server, called
xlclient2.
b). Copy all the files in directory /xlclient/Config/ from B
server's original design console folder to the newly duplicated one
- xlclient2
6) Start OIM Server
7) Start Design Console
Wednesday, December 16, 2009
OIM910 - Extend User Profile
OIM910 - Extend User Profile
It is obviously, you would need to extend user profile from time to time, so here is the steps to do it:
1) Define new field by using "User Defined Field Definition" in Design Console.
e.g.
Label Variant Type Length Column Name Order Field Type Propperties
Users.Suspension boolean 1 USR_UDF_SUSPENSION 22 CheckBox FALSE
2) Define lookup definition for new field
Code Field Lookup Type Group
Users.UDF.SUSPENSION USR_UDF_SUSPENSION Field Type Users
Code Key Decode
Account Suspension Account Suspension
3) Add new entry in xlWebAdmin.properties
global.label.accountsuspension=Account Suspension
4) Add new Attributes in FormMetaData.xml
<code>
<!-- List of attributes that can be displayed in the "User" Form -->
....
....
....
<Attribute name="-53" label="global.label.accountsuspension" displayComponentType="CheckBox" dataLength="1" map="Users.UDF.SUSPENSION" />
....
....
<!-- Fields that will be displayed on "user" form -->
<AttributeReference editable="true" optional="true"> -53</AttributeReference>
</code>
Restart OIM Server, You'lll see the newly added field "Account Suspension"
It is obviously, you would need to extend user profile from time to time, so here is the steps to do it:
1) Define new field by using "User Defined Field Definition" in Design Console.
e.g.
Label Variant Type Length Column Name Order Field Type Propperties
Users.Suspension boolean 1 USR_UDF_SUSPENSION 22 CheckBox FALSE
2) Define lookup definition for new field
Code Field Lookup Type Group
Users.UDF.SUSPENSION USR_UDF_SUSPENSION Field Type Users
Code Key Decode
Account Suspension Account Suspension
3) Add new entry in xlWebAdmin.properties
global.label.accountsuspension=Account Suspension
4) Add new Attributes in FormMetaData.xml
<code>
<!-- List of attributes that can be displayed in the "User" Form -->
....
....
....
<Attribute name="-53" label="global.label.accountsuspension" displayComponentType="CheckBox" dataLength="1" map="Users.UDF.SUSPENSION" />
....
....
<!-- Fields that will be displayed on "user" form -->
<AttributeReference editable="true" optional="true"> -53</AttributeReference>
</code>
Restart OIM Server, You'lll see the newly added field "Account Suspension"
Drop All User's Objects in a Single Query
Recently, I needed to find a single command to drop all the tables from an Oracle database without explicitly naming each table and without dropping the entire schema.
One possible solution would be to login as SYS and drop the schema itself,
e.g.
------------------------------
sqlplus sys/syspwd
Drop user username cascade
------------------------------
However, I don't want to drop the whole schema, and I just want to drop all the tables, constaints, triggers, sequence, procedures, database links, packages, so I come out with the following sql:
----------------------------------------------------------------------------------
set heading off;
set feedback off;
spool c:\dropobj.sql;
prompt --Drop constraint
select 'alter table '||table_name||' drop constraint '||constraint_name||' ;' from user_constraints where constraint_type='R';
prompt --Drop tables
select 'drop table '||table_name ||';' from user_tables;
prompt --Drop view
select 'drop view ' ||view_name||';' from user_views;
prompt --Drop sequence
select 'drop sequence ' ||sequence_name||';' from user_sequences;
prompt --Drop function
select 'drop function ' ||object_name||';' from user_objects where object_type='FUNCTION';
prompt --Drop procedure
select 'drop procedure '||object_name||';' from user_objects where object_type='PROCEDURE';
prompt --Drop package
prompt --Drop package body
select 'drop package '|| object_name||';' from user_objects where object_type='PACKAGE';
prompt --Drop database link
select 'drop database link '|| object_name||';' from user_objects where object_type='DATABASE LINK';
spool off;
set heading on;
set feedback on;
@@c:\dropobj.sql;
host del c:\dropobj.sql;
----------------------------------------------------------------------------------
I save it as an SQL file in the name of "ClearUserAllObjects.sql", then I login as the user that I want to delete all objects from, then execute the sql file. e.g.
sqlplus targetUser/targetUserPwd
@c:\ClearUserAllObjects.sql
then a clearing objects process begins, wait until it is done.
One possible solution would be to login as SYS and drop the schema itself,
e.g.
------------------------------
sqlplus sys/syspwd
Drop user username cascade
------------------------------
However, I don't want to drop the whole schema, and I just want to drop all the tables, constaints, triggers, sequence, procedures, database links, packages, so I come out with the following sql:
----------------------------------------------------------------------------------
set heading off;
set feedback off;
spool c:\dropobj.sql;
prompt --Drop constraint
select 'alter table '||table_name||' drop constraint '||constraint_name||' ;' from user_constraints where constraint_type='R';
prompt --Drop tables
select 'drop table '||table_name ||';' from user_tables;
prompt --Drop view
select 'drop view ' ||view_name||';' from user_views;
prompt --Drop sequence
select 'drop sequence ' ||sequence_name||';' from user_sequences;
prompt --Drop function
select 'drop function ' ||object_name||';' from user_objects where object_type='FUNCTION';
prompt --Drop procedure
select 'drop procedure '||object_name||';' from user_objects where object_type='PROCEDURE';
prompt --Drop package
prompt --Drop package body
select 'drop package '|| object_name||';' from user_objects where object_type='PACKAGE';
prompt --Drop database link
select 'drop database link '|| object_name||';' from user_objects where object_type='DATABASE LINK';
spool off;
set heading on;
set feedback on;
@@c:\dropobj.sql;
host del c:\dropobj.sql;
----------------------------------------------------------------------------------
I save it as an SQL file in the name of "ClearUserAllObjects.sql", then I login as the user that I want to delete all objects from, then execute the sql file. e.g.
sqlplus targetUser/targetUserPwd
@c:\ClearUserAllObjects.sql
then a clearing objects process begins, wait until it is done.
Tuesday, December 15, 2009
OIM910 - Prevent Exchange Overwrite title and department in AD User
OIM910 - Prevent Exchange Overwrite title and department in AD User
If you are using OIM910 standard adapter for exchange, you might notice that after you provision a exchange account, it overwrites the title and department attributes of AD account, that is probably not what you want.
So how to solve this issue?
The cause of this issue is process task "Set Exchange Related Properties" of Exchange process, this task sets the organization name for department, and employee type(role) for title in AD.
Once we known the cause, then solve it become easy, actually I am thinking of two method:
1) Create a new Adapter call "MEXC Set User Properties Basic", then map it to a newly created process task called "Set Exchange Related Properties" in Process Exchange, then you have to do all the mapping stuff.
Note that: We need to remove variable department and title in new adpater.
2) Maping the right property for department and title
Note: Don't change the process adapter
Example:
a. department -> User Definition (Users.Department)
b. corporateTitle -> User Definition (Users.JobTitle)
3) Mapping Empty String for process task "Set Exchange Related Properties"
a. department -> Literal (A Empty String)
b. corporateTitle -> Literal (A Empty String)
If you are using OIM910 standard adapter for exchange, you might notice that after you provision a exchange account, it overwrites the title and department attributes of AD account, that is probably not what you want.
So how to solve this issue?
The cause of this issue is process task "Set Exchange Related Properties" of Exchange process, this task sets the organization name for department, and employee type(role) for title in AD.
Once we known the cause, then solve it become easy, actually I am thinking of two method:
1) Create a new Adapter call "MEXC Set User Properties Basic", then map it to a newly created process task called "Set Exchange Related Properties" in Process Exchange, then you have to do all the mapping stuff.
Note that: We need to remove variable department and title in new adpater.
2) Maping the right property for department and title
Note: Don't change the process adapter
Example:
a. department -> User Definition (Users.Department)
b. corporateTitle -> User Definition (Users.JobTitle)
3) Mapping Empty String for process task "Set Exchange Related Properties"
a. department -> Literal (A Empty String)
b. corporateTitle -> Literal (A Empty String)
Monday, December 14, 2009
OIM910: Can not get ObjectGUID during provisioining Exchange account
Can not get ObjectGUID during provisioining Exchange account
As you know, exchange stores its informatin in AD, and when OIM provision exchange account, it needs to get the object GUID of the corresponding AD account.
What OIM actually do are summarized as below:
1) Check AD User Process
If Check AD User Process succeed, then proceed to step 2.
2) Get ObjectGUID from Process
What Get ObjectGUID from Process do is to get the corresponding object GUID, and save
it to exchange table : UD_MSEXCHG, column: UD_MSEXCHG_OBJECTUID , meaning get the AD account's object GUID from AD process table: UD_ADUSER, then convert it to exchange process table.
3) Check ObjectGUID Set
This step checks whether the column UD_MSEXCHG_OBJECTUID got set or not in step 2, if got set then proceed to step 4.
4) Create Mailbox.
As what we have stated above, the most important part of provisoning exchange account is getting objectGUID from AD process, which is step 2, so we need to discuss more about step 2, actually, step 2 needs to know the user key and IT resource key as a parameter for the query below:
*****************************************************************************
select distinct UD_ADUSER.UD_ADUSER_OBJECTGUID from UD_ADUSER UD_ADUSER, orc orc ,sta sta where UD_ADUSER.orc_key=orc.orc_key and orc.usr_key=2662 and UD_ADUSER.UD_ADUSER_AD=161 and orc.orc_status=STA.sta_status AND STA.sta_bucket != 'Cancelled'
****************************************************************************
Parameters:
-----------------------------------------
a. 2662 is a user Key in USR table.
b. 161 is a IT Resource Key in table SVR.
Explain how the get param a and b
(1) For user key, get be actually get from ORC (process table), as ORC has user key column, beside UD_MSEXCHG table has ORC_KEY column as well, that how be get user key,
(2) For IT Resource key, this is very obviously, UD_MSEXCHG has a column of AD IT Resource, UD_MSEXCHG_ADSERVER.
-----------------------------------------
Result
-----------------------------------------
UD_ADUSER.UD_ADUSER_OBJECTGUID
87e1bf040c85ba49b3d57ce9b4c38ec8
-----------------------------------------
How to solving the problem stated as the title of this article
If you can not get object GUID from UD_ADUSER table, and you confirmed that the corresponding AD account record in UD_ADUSER table has objectGUID, then the problem probably is that you use different AD IT Resource for AD User and Exchange,
e.g. You use ADITResource_DEV for AD User, but ADITResource for Exchange, and the key for ADITResource_DEV is 161, but the key for ADITResource is 1,
AD User - ADITResource_DEV - 161
Exchange - ADITResource - 1
so when you create exchange account, you will be executing the SQL below:
select distinct UD_ADUSER.UD_ADUSER_OBJECTGUID from UD_ADUSER UD_ADUSER, orc orc ,sta sta where UD_ADUSER.orc_key=orc.orc_key and orc.usr_key=2662 and UD_ADUSER.UD_ADUSER_AD=1 and orc.orc_status=STA.sta_status AND STA.sta_bucket != 'Cancelled'
Then you won't get any result, because corresponding AD User account in UD_ADUSER table has a key of ITResource key (UD_ADUSER.UD_ADUSER_AD) equals to 161, not 1 , that's the reason why you get not get object GUID from AD USER Table.
As you know, exchange stores its informatin in AD, and when OIM provision exchange account, it needs to get the object GUID of the corresponding AD account.
What OIM actually do are summarized as below:
1) Check AD User Process
If Check AD User Process succeed, then proceed to step 2.
2) Get ObjectGUID from Process
What Get ObjectGUID from Process do is to get the corresponding object GUID, and save
it to exchange table : UD_MSEXCHG, column: UD_MSEXCHG_OBJECTUID , meaning get the AD account's object GUID from AD process table: UD_ADUSER, then convert it to exchange process table.
3) Check ObjectGUID Set
This step checks whether the column UD_MSEXCHG_OBJECTUID got set or not in step 2, if got set then proceed to step 4.
4) Create Mailbox.
As what we have stated above, the most important part of provisoning exchange account is getting objectGUID from AD process, which is step 2, so we need to discuss more about step 2, actually, step 2 needs to know the user key and IT resource key as a parameter for the query below:
*****************************************************************************
select distinct UD_ADUSER.UD_ADUSER_OBJECTGUID from UD_ADUSER UD_ADUSER, orc orc ,sta sta where UD_ADUSER.orc_key=orc.orc_key and orc.usr_key=2662 and UD_ADUSER.UD_ADUSER_AD=161 and orc.orc_status=STA.sta_status AND STA.sta_bucket != 'Cancelled'
****************************************************************************
Parameters:
-----------------------------------------
a. 2662 is a user Key in USR table.
b. 161 is a IT Resource Key in table SVR.
Explain how the get param a and b
(1) For user key, get be actually get from ORC (process table), as ORC has user key column, beside UD_MSEXCHG table has ORC_KEY column as well, that how be get user key,
(2) For IT Resource key, this is very obviously, UD_MSEXCHG has a column of AD IT Resource, UD_MSEXCHG_ADSERVER.
-----------------------------------------
Result
-----------------------------------------
UD_ADUSER.UD_ADUSER_OBJECTGUID
87e1bf040c85ba49b3d57ce9b4c38ec8
-----------------------------------------
How to solving the problem stated as the title of this article
If you can not get object GUID from UD_ADUSER table, and you confirmed that the corresponding AD account record in UD_ADUSER table has objectGUID, then the problem probably is that you use different AD IT Resource for AD User and Exchange,
e.g. You use ADITResource_DEV for AD User, but ADITResource for Exchange, and the key for ADITResource_DEV is 161, but the key for ADITResource is 1,
AD User - ADITResource_DEV - 161
Exchange - ADITResource - 1
so when you create exchange account, you will be executing the SQL below:
select distinct UD_ADUSER.UD_ADUSER_OBJECTGUID from UD_ADUSER UD_ADUSER, orc orc ,sta sta where UD_ADUSER.orc_key=orc.orc_key and orc.usr_key=2662 and UD_ADUSER.UD_ADUSER_AD=1 and orc.orc_status=STA.sta_status AND STA.sta_bucket != 'Cancelled'
Then you won't get any result, because corresponding AD User account in UD_ADUSER table has a key of ITResource key (UD_ADUSER.UD_ADUSER_AD) equals to 161, not 1 , that's the reason why you get not get object GUID from AD USER Table.
Sunday, December 13, 2009
About Auto Save in OIM
About Auto Save in OIM
1. Make Resource Object Auto Save, if you don't want user's intervention with Object
form.
Note: Make sure object form has no mandatory fields, otherwise, you will not be able
to make resource object Auto-Saved.
2. Make Process ( normally provisioning process) Auto Save, if you don't user
to modify process form.
3. Make a Access Policy with approval, Add tcCompleteTask for "Awaiting Object Data"
process task, Add tcCompleteTask for process task "Approve".
once the policy is made, the approval process for the resource of that policy starts,
If User did not set Resource Object to Auto Save, then the approver will
not be able to see the "request". So set Object to Auto-Save.
4. Besides setting Object to Auto Save, we also need to make sure all the compulsory
field of that Object form has prepopulated or default value, So that
Approver will be able to See the "Request".
******** Actually, If the object form got compulsory field, then It can not be
Auto-saved.
5. If did above items correctly, the approver will be able to receive the requst,
and modify the object form, then approve or deny that request.
6. About Process Form Auto-Save.
If you have mandatory (required) field in your form, and you want your form to be
auto-saved, you must ensure that all the mandatory field either has prepopulated
value or default value.
e.g.
You have a process named "Exchange Request", and you have an process form associated
with it, called "UD_EXCHG", and this process form has a mandatory field call "Email
Alias".
In this case, if you want to make process "Exchange Request" Auto-saved, you must
either prepopulate value or using default value, so that the Auto-Save check box
on process "Exchange Request" is functioning correctly.
In conclusion, If you prepopulate value or set default value for process value, then
The Auto-Save feature of process works perfectly.
7. About Object Form Auto-Save.
If the object form got compulsory field, then It can not be Auto-saved.
In order to prove it, I made a test:
I got one compulsory field, and I set default value for it, then I make the resource
object auto-saved, However, It turned out the request resource process took me to
the object form -------------- Weird!!!!!!
e.g.
You have a Object named "Exchange Request", and you have an object form associated
with it, called "UD_EXCH_OB", and this obect form has a mandatory field call "Email
Alias".
So If you want to make this object "Exchange Request" auto-saved, you'd better make
all the form not compulsory!!!, meaning make "Email Alias" a normal non-compulsory '
field.
*********
Note that:
If the Object Form got "password" field, even you can make the auto-save works, you
will never get pass the submit request, ---- a every strange exception will be
thrown, saying that you could not save the request, and you can get any database
connections ---------------------------
***********
Solution for password synchronization.
You want to synchronize password between OIM and target resource, and you also want
to make object form auto-saved, the only way to do is to following the precedure
below:
1) Remote Password Field from Process Data Flow Mapping.
2) Remove Password Field and its "prepops" from Object Form.
3) Add Password Prepop for the corresponding Process Form.(push data from user
definition)
In This way, User OIM password could be successfully synchronize to target resource.
Note: please make sure object form has no compulsory field, otherwise, you won't be
able to auto-save object form during request.
Monday, December 7, 2009
OIM Service Account vs Normal Account
OIM Service Account vs Normal Account
1. Service Account
Events:
Service Account Alert
Service Account Changed
Service Account Moved
2. Normal Account
Triggers:
Lookup.USR_PROCESS_TRIGGERS
We can configure trigger for normal account, so that resource profile
shall be changed upon OIM profile changed.
e.g.
Code Decoded
USR_PASSWORD - Change User Password
We add "Change User Password" as a process task name to process definition,
once USR_PASSWORD is changed in OIM Account, the process task:
Change User Password shalled be triggerd to run!
3. Differences:
the trigger: Lookup.USR_PROCESS_TRIGGERS has no effects to Service Account!
and
the Service Account Event won't be triggered for normal account.
4. More Explain on Service Account Event:
Service Account Alert - Triggered when target service account's Owner's OIM
account is disabled or deleted.
Service Account Changed - Triggered when service account Changed,
e.g. From Regular Account To Service Account, or From Service Account To Regular
Account.
Service Account Moved - Triggered when service account's owner is changed.
5. Use Service Account Event to Update Target Resource ProfileThis is an example:
a). We defined process task "Change Description" in service account provisioning process. This task changes the process data "Description"
b). We defined process task "Change Group Owner ID", This Task changes the process
data "Group Owner ID".
c). We configured "Service Account Alert" in that process.
d). we set "Tasks to Generate" of "Change Description" and "Change Group Owner ID"
for response "true" of process task : "Service Account Alert", so that the tasks that
we defined in step a and b will be triggered once "Sercie Account Alert" task is
completed, meaning right after service account ownership is tranfered.
e). then we disable User OIM account, the "Service Account Alert" task will be
triggered, after that "Change Description" and "Change Group Owner ID" runs after
because the owner has been changed.
1. Service Account
Events:
Service Account Alert
Service Account Changed
Service Account Moved
2. Normal Account
Triggers:
Lookup.USR_PROCESS_TRIGGERS
We can configure trigger for normal account, so that resource profile
shall be changed upon OIM profile changed.
e.g.
Code Decoded
USR_PASSWORD - Change User Password
We add "Change User Password" as a process task name to process definition,
once USR_PASSWORD is changed in OIM Account, the process task:
Change User Password shalled be triggerd to run!
3. Differences:
the trigger: Lookup.USR_PROCESS_TRIGGERS has no effects to Service Account!
and
the Service Account Event won't be triggered for normal account.
4. More Explain on Service Account Event:
Service Account Alert - Triggered when target service account's Owner's OIM
account is disabled or deleted.
Service Account Changed - Triggered when service account Changed,
e.g. From Regular Account To Service Account, or From Service Account To Regular
Account.
Service Account Moved - Triggered when service account's owner is changed.
5. Use Service Account Event to Update Target Resource ProfileThis is an example:
a). We defined process task "Change Description" in service account provisioning process. This task changes the process data "Description"
b). We defined process task "Change Group Owner ID", This Task changes the process
data "Group Owner ID".
c). We configured "Service Account Alert" in that process.
d). we set "Tasks to Generate" of "Change Description" and "Change Group Owner ID"
for response "true" of process task : "Service Account Alert", so that the tasks that
we defined in step a and b will be triggered once "Sercie Account Alert" task is
completed, meaning right after service account ownership is tranfered.
e). then we disable User OIM account, the "Service Account Alert" task will be
triggered, after that "Change Description" and "Change Group Owner ID" runs after
because the owner has been changed.
Saturday, December 5, 2009
OIM910 - Process Event
Reconciliation Events
Reconciliation Insert Received
Reconciliation Update Received
Reconciliation Delete Received
Service Account Alert
Service Account Alert
Service Account Changed
Service Account Moved
Field Updated Event
Use "Field Label Name + Updated" as the process task name so that this process task will become an field updated event, meaning if we update that Field, this process task will be called. e.g. We have Label "Group Name" in Process From "UD_ADGRP", if we create a process task in "AD Group" (Process Name), called "Group Name Updated", it will be triggering by Group Name field update event.
Enable and Disble Event
When we create process task we can assign the Task Effect as "Disable Process or Access to Appiction" or "Enable Process or Access to Application".
"Disable Process or Access to Appiction" triggers by Disable button of Resource Profile page and User Detail page.
"Disable Process or Access to Appiction" triggers by Disable button of Resource Profile page and User Detail page.
So If user click either of button, the corresponding event will be triggered.
More Explain on Service Account Event:
Service Account Alert - Triggered when target service account's Owner's OIM
account is disabled or deleted.
Service Account Changed - Triggered when service account's owner is changed.
Service Account Moved -
Reconciliation Insert Received
Reconciliation Update Received
Reconciliation Delete Received
Service Account Alert
Service Account Alert
Service Account Changed
Service Account Moved
Field Updated Event
Use "Field Label Name + Updated" as the process task name so that this process task will become an field updated event, meaning if we update that Field, this process task will be called. e.g. We have Label "Group Name" in Process From "UD_ADGRP", if we create a process task in "AD Group" (Process Name), called "Group Name Updated", it will be triggering by Group Name field update event.
Enable and Disble Event
When we create process task we can assign the Task Effect as "Disable Process or Access to Appiction" or "Enable Process or Access to Application".
"Disable Process or Access to Appiction" triggers by Disable button of Resource Profile page and User Detail page.
"Disable Process or Access to Appiction" triggers by Disable button of Resource Profile page and User Detail page.
So If user click either of button, the corresponding event will be triggered.
More Explain on Service Account Event:
Service Account Alert - Triggered when target service account's Owner's OIM
account is disabled or deleted.
Service Account Changed - Triggered when service account's owner is changed.
Service Account Moved -
OIM910 - How to use lookup query
The example I am taking here is to have a lookup from a custom table "access_table" containing three
columns access_id, descritption and groupname (this is the column stating which group has access to which
switch)
Steps to follow:
1. Mandatory properties to specify are :
a) Lookup Query e.g.
select distinct a.access_id, a.description from access_table a, usg b, ugp c, usr d where c.ugp_name =
a.group_name and b.ugp_key = c.ugp_key and b.usr_key = d.usr_key and d.usr_status ='Active' and d.USR_LOGIN
= '$Requester Information.User Login$'
b) Column captions e.g. Access ID, Description
This will ensure that in the lookup table displayed in UI will have two columns Access Id and description.
c)Columns names e.g. ACCESS_ID,DESCRIPTION, these are the columns specified in the select query.
ACCESS_ID AND DESCRIPTION must have its own lookup code, otherwise it can not be inserted as
columns names, so let's say ACCESS_ID AND DESCRIPTION have their lookup code shown below:
code : Users.UDF.Access_id
field: ACCESS_ID
lookup type: field type
code: Users.UDF.DESCRIPTION
field: DESCRIPTION
lookup type: field type
In order to make the lookup query work, we need to the corresponding lookup filed in
"xlWebAdmin.properties",
otherwise, the pop-up window(lookup window) will not show captions and values!
===================================================================================
lookupfield.header.users.udf.access_id=Access ID
lookupfield.header.users.udf.description=Description
===================================================================================
Noted the captions have been converted to LOWER CASE and BLANK SPACE has been repaced with "-". Put in
section "LOOKUPFIELD column headers".
The LOOKUP FILED HEADER IS BASED ON LOOKUP CODE! NOT THE COLUMN NAME.
d) Lookup column name e.g. ACCESS_ID, this is the column that is put in the textfield associated with
lookup field.
e) Column widths e.g. 25,100 This is the column width in table
columns access_id, descritption and groupname (this is the column stating which group has access to which
switch)
Steps to follow:
1. Mandatory properties to specify are :
a) Lookup Query e.g.
select distinct a.access_id, a.description from access_table a, usg b, ugp c, usr d where c.ugp_name =
a.group_name and b.ugp_key = c.ugp_key and b.usr_key = d.usr_key and d.usr_status ='Active' and d.USR_LOGIN
= '$Requester Information.User Login$'
b) Column captions e.g. Access ID, Description
This will ensure that in the lookup table displayed in UI will have two columns Access Id and description.
c)Columns names e.g. ACCESS_ID,DESCRIPTION, these are the columns specified in the select query.
ACCESS_ID AND DESCRIPTION must have its own lookup code, otherwise it can not be inserted as
columns names, so let's say ACCESS_ID AND DESCRIPTION have their lookup code shown below:
code : Users.UDF.Access_id
field: ACCESS_ID
lookup type: field type
code: Users.UDF.DESCRIPTION
field: DESCRIPTION
lookup type: field type
In order to make the lookup query work, we need to the corresponding lookup filed in
"xlWebAdmin.properties",
otherwise, the pop-up window(lookup window) will not show captions and values!
===================================================================================
lookupfield.header.users.udf.access_id=Access ID
lookupfield.header.users.udf.description=Description
===================================================================================
Noted the captions have been converted to LOWER CASE and BLANK SPACE has been repaced with "-". Put in
section "LOOKUPFIELD column headers".
The LOOKUP FILED HEADER IS BASED ON LOOKUP CODE! NOT THE COLUMN NAME.
d) Lookup column name e.g. ACCESS_ID, this is the column that is put in the textfield associated with
lookup field.
e) Column widths e.g. 25,100 This is the column width in table
Friday, November 20, 2009
OIM910 - Exchange 2007 Connector Create Mailbox Fail
OIM910 - Exchange 2007 Connector Create Mailbox Fail
I have OIM 9.1.0 installed, and I am using Exchange Connector 9.1.0, and I configured my exchange IT Resource to use Remote Manager, and I did the following steps to create mailbox.
1. Provision AD User account to OIM User.
2. Once I created the AD account, then I provision exchange 2007 account with the remote manager up, but I failed to create mailbox.
Here is the procedure how exchange connector create mailbox.
1. first it check if the mailbox is already present in the Exchange.
2. If it is not present then it execute the scripts createmailboxexchange2007.vbs script using the remote manager.
3. It then again checks if the mailbox is created.
The error log as shown below:
"DEBUG,19 Nov 2009 14:01:19,977,http://OIMCP.MEXC,com.thortech.xl.integration.Exchange.tcExchangeTasks : checkMailboxCreation : No value for homeMDB fetched
INFO,19 Nov 2009 14:01:19,978,http://OIMCP.MEXC,com.thortech.xl.integration.Exchange.tcExchangeTasks : checkMailboxCreation : Unable to execute the Power Shell command"
So basically step2 was failed, so in step 3, can not get attribute homeMDB, if step 2 succeed, in step3 , OIM should be able to get attribute value for homeMDB, as for now, I believe something wrong with the script "CreateMailboxExchange2007" .
Here is what I did on the remote manager host machine.
I manually execute the script "CreateMailboxExchange2007", and It worked!
so there is nothing wrong with the script, so I begun to believe there was something wrong with the Java and powershell, below are my spec for java and powershell.
Java: jdk-6u17-windows-i586 ---- 32bit
Powershell: WindowsServer2003.WindowsXP-KB926139-v2-x64-ENU ---- 64bit
OS: Window Server 2003 x64 Enterprise Edition
So I think the problem might be 32bit and 64bit powershell can not work together,
So I installed 64bit java (jdk-6u17-windows-x64) instead, and It turned out to be working an fix the problem.
Just for your information, below are a java program which can create mailbox with the help of "CreateMailboxExchange2007.vbs"
import java.io.*;
public class RunScript {
public static void main(String [] args){
try {
//String cmd ="cmd /c C:\\oracle\\xlremote\\scripts\\CreateMailboxExchange2007.vbs";
//String cmd ="C:/oracle/xlremote/scripts/CreateMailboxExchange2007.vbs";
String cmd ="C:\\oracle\\xlremote\\scripts\\CreateMailboxExchange2007.vbs test5@celcomdev.ad \"Mailbox Database\" \"C:\\oracle\\xlremote\\log\\Report.log\"";
//String cmd="PowerShell.exe -PSConsoleFile C:\Program Files\Microsoft\Exchange Server\Bin\exshell.psc1 -noexit ""&{""Enable-Mailbox test4@celcomdev.ad -Database \'Mailbox Database\'\;\exit 0\} >> \'C:\oracle\xlremote\log\Report.log\'";
//String cmd = "C:\\WINDOWS\\system32\\WindowsPowerShell\\v1.0\\PowerShell.exe -PSConsoleFile \"C:\\Program Files\\Microsoft\\Exchange Server\\bin\\exshell.psc1\" -noexit & {\"Enable-Mailbox test4@celcomdev.ad -Database \'Mailbox Database\'\";\"exit 0\"} >> \'C:\\oracle\\xlremote\\log\\Report.log\'";
//String cmd = "cmd /c powershell C:\\Program Files\\Microsoft\\Exchange Server\\bin\\exshell.psc1 & {\"Enable-Mailbox test4@celcomdev.ad -Database \'Mailbox Database\'\"}";
//String cmd = "PowerShell.exe -PSConsoleFile \'C:\\Program Files\\Microsoft\\Exchange Server\\bin\\exshell.psc1\' -noexit -command \". \'C:\\Program Files\\Microsoft\\Exchange Server\\bin\\Exchange.ps1\'; Enable-Mailbox test4 -Database \'Mailbox Database\'";
//String cmd = "PowerShell.exe -PSConsoleFile \"C:\\Program Files\\Microsoft\\Exchange Server\\bin\\exshell.psc1\" -noexit -command \". \'C:\\Program Files\\Microsoft\\Exchange Server\\bin\\Exchange.ps1\'; Enable-Mailbox test4 -Database \'Mailbox Database\'";
//String cmd = "C:\\Program Files\\Microsoft\\Exchange Server\\bin\\Exchange.ps1 Enable-Mailbox -Identity test4 -Database \'Mailbox Database\'";
//String cmd = "cmd /c mkdir test2";
File file = new File("C:\\oracle\\xlremote\\scripts\\CreateMailboxExchange2007.vbs");
if(!file.exists())
{
System.out.println("File not existed.");
}
Runtime runtime = Runtime.getRuntime();
Process process = runtime.exec("cscript.exe " + cmd);
//Process process = runtime.exec("cmd /c " + cmd);
//Process process = runtime.exec( cmd );
int i = process.waitFor();
InputStream inputstream = process.getInputStream();
InputStreamReader inputstreamreader = new InputStreamReader(inputstream);
BufferedReader bufferedreader = new BufferedReader(inputstreamreader);
String line;
PrintWriter printwrite = new PrintWriter(new FileWriter("test.txt", true));
while ((line = bufferedreader.readLine()) != null) {
System.out.println(line);
printwrite.println(line);
}
printwrite.close();
process.getOutputStream().close();
String response = i != 0 ? "EXCHANGE.REMOTE_SCRIPT_RUN_SUCCESS" : "EXCHANGE.REMOTE_SCRIPT_RUN_FAILURE";
System.out.println(response);
} catch(Exception ex) {
ex.printStackTrace();
}
}
}
=============================================================
Useful link to get started with Using powershell to administrate Exchange 2007
http://www.exchangeninjas.com/PSSCategories
I have OIM 9.1.0 installed, and I am using Exchange Connector 9.1.0, and I configured my exchange IT Resource to use Remote Manager, and I did the following steps to create mailbox.
1. Provision AD User account to OIM User.
2. Once I created the AD account, then I provision exchange 2007 account with the remote manager up, but I failed to create mailbox.
Here is the procedure how exchange connector create mailbox.
1. first it check if the mailbox is already present in the Exchange.
2. If it is not present then it execute the scripts createmailboxexchange2007.vbs script using the remote manager.
3. It then again checks if the mailbox is created.
The error log as shown below:
"DEBUG,19 Nov 2009 14:01:19,977,http://OIMCP.MEXC,com.thortech.xl.integration.Exchange.tcExchangeTasks : checkMailboxCreation : No value for homeMDB fetched
INFO,19 Nov 2009 14:01:19,978,http://OIMCP.MEXC,com.thortech.xl.integration.Exchange.tcExchangeTasks : checkMailboxCreation : Unable to execute the Power Shell command"
So basically step2 was failed, so in step 3, can not get attribute homeMDB, if step 2 succeed, in step3 , OIM should be able to get attribute value for homeMDB, as for now, I believe something wrong with the script "CreateMailboxExchange2007" .
Here is what I did on the remote manager host machine.
I manually execute the script "CreateMailboxExchange2007", and It worked!
so there is nothing wrong with the script, so I begun to believe there was something wrong with the Java and powershell, below are my spec for java and powershell.
Java: jdk-6u17-windows-i586 ---- 32bit
Powershell: WindowsServer2003.WindowsXP-KB926139-v2-x64-ENU ---- 64bit
OS: Window Server 2003 x64 Enterprise Edition
So I think the problem might be 32bit and 64bit powershell can not work together,
So I installed 64bit java (jdk-6u17-windows-x64) instead, and It turned out to be working an fix the problem.
Just for your information, below are a java program which can create mailbox with the help of "CreateMailboxExchange2007.vbs"
import java.io.*;
public class RunScript {
public static void main(String [] args){
try {
//String cmd ="cmd /c C:\\oracle\\xlremote\\scripts\\CreateMailboxExchange2007.vbs";
//String cmd ="C:/oracle/xlremote/scripts/CreateMailboxExchange2007.vbs";
String cmd ="C:\\oracle\\xlremote\\scripts\\CreateMailboxExchange2007.vbs test5@celcomdev.ad \"Mailbox Database\" \"C:\\oracle\\xlremote\\log\\Report.log\"";
//String cmd="PowerShell.exe -PSConsoleFile C:\Program Files\Microsoft\Exchange Server\Bin\exshell.psc1 -noexit ""&{""Enable-Mailbox test4@celcomdev.ad -Database \'Mailbox Database\'\;\exit 0\} >> \'C:\oracle\xlremote\log\Report.log\'";
//String cmd = "C:\\WINDOWS\\system32\\WindowsPowerShell\\v1.0\\PowerShell.exe -PSConsoleFile \"C:\\Program Files\\Microsoft\\Exchange Server\\bin\\exshell.psc1\" -noexit & {\"Enable-Mailbox test4@celcomdev.ad -Database \'Mailbox Database\'\";\"exit 0\"} >> \'C:\\oracle\\xlremote\\log\\Report.log\'";
//String cmd = "cmd /c powershell C:\\Program Files\\Microsoft\\Exchange Server\\bin\\exshell.psc1 & {\"Enable-Mailbox test4@celcomdev.ad -Database \'Mailbox Database\'\"}";
//String cmd = "PowerShell.exe -PSConsoleFile \'C:\\Program Files\\Microsoft\\Exchange Server\\bin\\exshell.psc1\' -noexit -command \". \'C:\\Program Files\\Microsoft\\Exchange Server\\bin\\Exchange.ps1\'; Enable-Mailbox test4 -Database \'Mailbox Database\'";
//String cmd = "PowerShell.exe -PSConsoleFile \"C:\\Program Files\\Microsoft\\Exchange Server\\bin\\exshell.psc1\" -noexit -command \". \'C:\\Program Files\\Microsoft\\Exchange Server\\bin\\Exchange.ps1\'; Enable-Mailbox test4 -Database \'Mailbox Database\'";
//String cmd = "C:\\Program Files\\Microsoft\\Exchange Server\\bin\\Exchange.ps1 Enable-Mailbox -Identity test4 -Database \'Mailbox Database\'";
//String cmd = "cmd /c mkdir test2";
File file = new File("C:\\oracle\\xlremote\\scripts\\CreateMailboxExchange2007.vbs");
if(!file.exists())
{
System.out.println("File not existed.");
}
Runtime runtime = Runtime.getRuntime();
Process process = runtime.exec("cscript.exe " + cmd);
//Process process = runtime.exec("cmd /c " + cmd);
//Process process = runtime.exec( cmd );
int i = process.waitFor();
InputStream inputstream = process.getInputStream();
InputStreamReader inputstreamreader = new InputStreamReader(inputstream);
BufferedReader bufferedreader = new BufferedReader(inputstreamreader);
String line;
PrintWriter printwrite = new PrintWriter(new FileWriter("test.txt", true));
while ((line = bufferedreader.readLine()) != null) {
System.out.println(line);
printwrite.println(line);
}
printwrite.close();
process.getOutputStream().close();
String response = i != 0 ? "EXCHANGE.REMOTE_SCRIPT_RUN_SUCCESS" : "EXCHANGE.REMOTE_SCRIPT_RUN_FAILURE";
System.out.println(response);
} catch(Exception ex) {
ex.printStackTrace();
}
}
}
=============================================================
Useful link to get started with Using powershell to administrate Exchange 2007
http://www.exchangeninjas.com/PSSCategories
Thursday, November 12, 2009
How OIM profile update trigger works.
How OIM profile update trigger works.
As you know the trigger lookup code is Lookup.USR_PROCESS_TRIGGERS ,
and a series of OIM USER attributes and process name mappings are
stored in this lookup code.
For Example,
We have a mapping as shown below:
USR_UDF_GROUP ---> Change User Group
so we have an user defined field "group" for OIM profile.
we aleady add process task "Change User Group" to AD User Process as
a conditional task.
we have created an adapter task, say getUserGroup, this adapter task
simple grab user group information from OIM profile (user definition data),
getUserGroup:
attribute: userGroup
return:userGroup
then what we do is to add this adapter to process task "Change User Group",
map attribute userGroup to user definition data "group", and map the adapter
return value to process data attribute "organization name".
As a result, once user changes his/her OIM profile attribute "group", process task
"Change User Group" will be triggered to run, after that, process task
"Organization Name Updated" runs afterward.
Summary: we use "Change User Group" task to convert user definition data "group" to
process data "Organization name", since we updated attribute "group" of OIM profile,
its mapped attribute "Organization name" will be triggered to run, as a result, AD user's
organization name will be updated.
As you know the trigger lookup code is Lookup.USR_PROCESS_TRIGGERS ,
and a series of OIM USER attributes and process name mappings are
stored in this lookup code.
For Example,
We have a mapping as shown below:
USR_UDF_GROUP ---> Change User Group
so we have an user defined field "group" for OIM profile.
we aleady add process task "Change User Group" to AD User Process as
a conditional task.
we have created an adapter task, say getUserGroup, this adapter task
simple grab user group information from OIM profile (user definition data),
getUserGroup:
attribute: userGroup
return:userGroup
then what we do is to add this adapter to process task "Change User Group",
map attribute userGroup to user definition data "group", and map the adapter
return value to process data attribute "organization name".
As a result, once user changes his/her OIM profile attribute "group", process task
"Change User Group" will be triggered to run, after that, process task
"Organization Name Updated" runs afterward.
Summary: we use "Change User Group" task to convert user definition data "group" to
process data "Organization name", since we updated attribute "group" of OIM profile,
its mapped attribute "Organization name" will be triggered to run, as a result, AD user's
organization name will be updated.
Friday, November 6, 2009
Adapters
Adatpers can be classified as below:
- Process Task
- Rule Generator
- Pre-populate Rule Generator
- Entity
- Task Assignment
To enable the adapter to automate a process task, select Process Task (T)
To incorporate business rules into an Oracle Identity Manager or user-defined form field, select Rule Generator (R)
example, for the User ID field of a form, you can configure Oracle Identity Manager to concatenate the initial letter of the user's first name with the user's last name.
You can attach a type of rule generator adapter to a user-created form field, so that it can:
◦Display the data, which is generated by the adapter, automatically or manually.
◦Use criteria that enable Oracle Identity Manager to determine which adapter is applied to the designated form field.
To attach the adapter to an Oracle Identity Manager or user-defined form field, and have Oracle Identity Manager trigger the adapter on preinsert, preupdate, predelete, postinsert, postupdate, or postdelete, select Entity (E).
To allow the adapter to automate the allocation of a process task to a user or group, select Task Assignment (A).
Thursday, November 5, 2009
Resource Object Process and Forms
Summary:
A Resource Object defines a resource in Identity Management System, and each resource object has several process associated with it, and one of the process is configured to be the default process for that resource object, moreover, a process can be associate with a from which helps process to collect data that will be used by the process tasks of that process.
Resource Object
Resource object definitions are templates for provisioning the resource. However, the approval and provisioning of the resource depends on the design of the approval and provisioning processes that you link to the resource object.
Process
A process is the mechanism for representing a logical workflow for approvals or provisioning in Oracle Identity Manager. Process definitions consist of tasks. Process tasks represent the steps that you must complete to fulfill the purpose of a process.
In an approval process, the tasks can represent individual approvals that are required for an action to take place.
In a provisioning process, tasks are used to enable a user or organization to access the target resource.
Form
From is the object that collects user inputs and make the inputs available to the process that the form is associated with.
Child From
We have already known that froms is meant to be associated with process, and the data that from collects will be available to the process tasks within that process.
For example, AD User From(UD_ADUSER) has a child form AD User Group Details(UD_ADUSRC). AD User Form is used to provision AD resource to OIM user, and AD User Group Detail form is used to assign AD user to specific AD group object as a member, thus there are actually two froms are associated with AD User process which is the default process for resource object AD User, then now the question is how the process tasks behaves after we submit AD User form with data filled in its child form AD User Group Detail from (where we select group from AD User). Once we submit that form to provision a AD account, all the unconditional tasks will be triggered to run, as well as the process tasks which has its child table attribute set to UD_USRC and trigge type to "insert" will be triggered to run also, for example the "Create User" process task which is unconditional, so it will be triggered to run, as well as process task "Add User To Group" will be triggered to run also, as is child table trigger type is "insert".
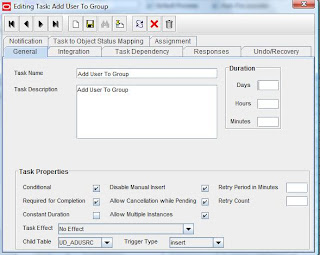
A Resource Object defines a resource in Identity Management System, and each resource object has several process associated with it, and one of the process is configured to be the default process for that resource object, moreover, a process can be associate with a from which helps process to collect data that will be used by the process tasks of that process.
Resource Object
Resource object definitions are templates for provisioning the resource. However, the approval and provisioning of the resource depends on the design of the approval and provisioning processes that you link to the resource object.
Process
A process is the mechanism for representing a logical workflow for approvals or provisioning in Oracle Identity Manager. Process definitions consist of tasks. Process tasks represent the steps that you must complete to fulfill the purpose of a process.
In an approval process, the tasks can represent individual approvals that are required for an action to take place.
In a provisioning process, tasks are used to enable a user or organization to access the target resource.
Form
From is the object that collects user inputs and make the inputs available to the process that the form is associated with.
Child From
We have already known that froms is meant to be associated with process, and the data that from collects will be available to the process tasks within that process.
For example, AD User From(UD_ADUSER) has a child form AD User Group Details(UD_ADUSRC). AD User Form is used to provision AD resource to OIM user, and AD User Group Detail form is used to assign AD user to specific AD group object as a member, thus there are actually two froms are associated with AD User process which is the default process for resource object AD User, then now the question is how the process tasks behaves after we submit AD User form with data filled in its child form AD User Group Detail from (where we select group from AD User). Once we submit that form to provision a AD account, all the unconditional tasks will be triggered to run, as well as the process tasks which has its child table attribute set to UD_USRC and trigge type to "insert" will be triggered to run also, for example the "Create User" process task which is unconditional, so it will be triggered to run, as well as process task "Add User To Group" will be triggered to run also, as is child table trigger type is "insert".

Sunday, September 13, 2009
How to generate a keypair
How to generate keypair by using keytool
The following command generates a keypair which will valid for 20 years .
C:\>keytool -genkeypair -alias test -validity 7200 -keystore teststore -storepass passw0rd -keypass passw0rd -dname "cn=test, ou=test, o=test, l=test, st=test, c=test"
The keystore
2. Export public key certificateExport.
The following command exports the public key certificate that we hava just generated in step 1:
C:\>keytool -exportcert -alias test -keystore teststore -storepass passw0rd -file testcert.cer
Certificate stored in file
You'll find the public key certificate named testcert.cer in current working directory
3. Import public key certificate to keystore
The following command imports the public key certificate to keystore
C:\>keytool -import -trustcacerts -alias testtrusted -keystore teststore -storepass passw0rd -file testcert.cer
Certificate already exists in keystore under alias
Certificate was added to keystore
4. View keystore details:
C:\>keytool -list -v -keystore teststore -storepass passw0rd
Keystore type: JKSKeystore provider: SUN
Your keystore contains 2 entries
Alias name: testtrustedCreation date: Sep 13, 2009Entry type: trustedCertEntry
Owner: CN=test, OU=test, O=test, L=test, ST=test, C=testIssuer: CN=test, OU=test, O=test, L=test, ST=test, C=testSerial number: 4aacbeadValid from: Sun Sep 13 17:43:09 SGT 2009 until: Thu May 31 17:43:09 SGT 2029Certificate fingerprints:
MD5: CC:4B:EC:BD:10:F0:B0:8E:39:01:B9:C7:54:81:6B:76
SHA1: 3F:5E:48:94:D4:78:F4:4D:FC:8F:64:86:7E:87:7B:AE:4B:D0:C4:7F Signature algorithm name: SHA1withDSA Version: 3
**************************************************************************************
Alias name: testCreation date: Sep 13, 2009Entry type: PrivateKeyEntryCertificate chain length: 1Certificate[1]:Owner: CN=test, OU=test, O=test, L=test, ST=test, C=testIssuer: CN=test, OU=test, O=test, L=test, ST=test, C=testSerial number: 4aacbeadValid from: Sun Sep 13 17:43:09 SGT 2009 until: Thu May 31 17:43:09 SGT 2029Certificate fingerprints: MD5: CC:4B:EC:BD:10:F0:B0:8E:39:01:B9:C7:54:81:6B:76 SHA1: 3F:5E:48:94:D4:78:F4:4D:FC:8F:64:86:7E:87:7B:AE:4B:D0:C4:7F Signature algorithm name: SHA1withDSA Version: 3
**************************************************************************************
PrivateKeyEntry will be used for server to establish ssl communication, while trustedCertEntry will be used for certificate
validity checking during ssl handshake. to be clearly, the public key certificate from PrivateKeyEntry will be sent from server
to client during ssl handshake, then client will verify that certicate against its trusted keystore, if client find that
certificate or its root certicate is already in its trusted keystore, then the client will say the server is trusted, then a SSL
session will be established.
Subscribe to:
Posts (Atom)