OIM910 - Extend User Profile
It is obviously, you would need to extend user profile from time to time, so here is the steps to do it:
1) Define new field by using "User Defined Field Definition" in Design Console.
e.g.
Label Variant Type Length Column Name Order Field Type Propperties
Users.Suspension boolean 1 USR_UDF_SUSPENSION 22 CheckBox FALSE
2) Define lookup definition for new field
Code Field Lookup Type Group
Users.UDF.SUSPENSION USR_UDF_SUSPENSION Field Type Users
Code Key Decode
Account Suspension Account Suspension
3) Add new entry in xlWebAdmin.properties
global.label.accountsuspension=Account Suspension
4) Add new Attributes in FormMetaData.xml
<code>
<!-- List of attributes that can be displayed in the "User" Form -->
....
....
....
<Attribute name="-53" label="global.label.accountsuspension" displayComponentType="CheckBox" dataLength="1" map="Users.UDF.SUSPENSION" />
....
....
<!-- Fields that will be displayed on "user" form -->
<AttributeReference editable="true" optional="true"> -53</AttributeReference>
</code>
Restart OIM Server, You'lll see the newly added field "Account Suspension"
Wednesday, December 16, 2009
Drop All User's Objects in a Single Query
Recently, I needed to find a single command to drop all the tables from an Oracle database without explicitly naming each table and without dropping the entire schema.
One possible solution would be to login as SYS and drop the schema itself,
e.g.
------------------------------
sqlplus sys/syspwd
Drop user username cascade
------------------------------
However, I don't want to drop the whole schema, and I just want to drop all the tables, constaints, triggers, sequence, procedures, database links, packages, so I come out with the following sql:
----------------------------------------------------------------------------------
set heading off;
set feedback off;
spool c:\dropobj.sql;
prompt --Drop constraint
select 'alter table '||table_name||' drop constraint '||constraint_name||' ;' from user_constraints where constraint_type='R';
prompt --Drop tables
select 'drop table '||table_name ||';' from user_tables;
prompt --Drop view
select 'drop view ' ||view_name||';' from user_views;
prompt --Drop sequence
select 'drop sequence ' ||sequence_name||';' from user_sequences;
prompt --Drop function
select 'drop function ' ||object_name||';' from user_objects where object_type='FUNCTION';
prompt --Drop procedure
select 'drop procedure '||object_name||';' from user_objects where object_type='PROCEDURE';
prompt --Drop package
prompt --Drop package body
select 'drop package '|| object_name||';' from user_objects where object_type='PACKAGE';
prompt --Drop database link
select 'drop database link '|| object_name||';' from user_objects where object_type='DATABASE LINK';
spool off;
set heading on;
set feedback on;
@@c:\dropobj.sql;
host del c:\dropobj.sql;
----------------------------------------------------------------------------------
I save it as an SQL file in the name of "ClearUserAllObjects.sql", then I login as the user that I want to delete all objects from, then execute the sql file. e.g.
sqlplus targetUser/targetUserPwd
@c:\ClearUserAllObjects.sql
then a clearing objects process begins, wait until it is done.
Tuesday, December 15, 2009
OIM910 - Prevent Exchange Overwrite title and department in AD User
OIM910 - Prevent Exchange Overwrite title and department in AD User
If you are using OIM910 standard adapter for exchange, you might notice that after you provision a exchange account, it overwrites the title and department attributes of AD account, that is probably not what you want.
So how to solve this issue?
The cause of this issue is process task "Set Exchange Related Properties" of Exchange process, this task sets the organization name for department, and employee type(role) for title in AD.
Once we known the cause, then solve it become easy, actually I am thinking of two method:
1) Create a new Adapter call "MEXC Set User Properties Basic", then map it to a newly created process task called "Set Exchange Related Properties" in Process Exchange, then you have to do all the mapping stuff.
Note that: We need to remove variable department and title in new adpater.
2) Maping the right property for department and title
Note: Don't change the process adapter
Example:
a. department -> User Definition (Users.Department)
b. corporateTitle -> User Definition (Users.JobTitle)
3) Mapping Empty String for process task "Set Exchange Related Properties"
a. department -> Literal (A Empty String)
b. corporateTitle -> Literal (A Empty String)
Monday, December 14, 2009
OIM910: Can not get ObjectGUID during provisioining Exchange account
Can not get ObjectGUID during provisioining Exchange account
As you know, exchange stores its informatin in AD, and when OIM provision exchange account, it needs to get the object GUID of the corresponding AD account.
What OIM actually do are summarized as below:
1) Check AD User Process
If Check AD User Process succeed, then proceed to step 2.
2) Get ObjectGUID from Process
What Get ObjectGUID from Process do is to get the corresponding object GUID, and save
it to exchange table : UD_MSEXCHG, column: UD_MSEXCHG_OBJECTUID , meaning get the AD account's object GUID from AD process table: UD_ADUSER, then convert it to exchange process table.
3) Check ObjectGUID Set
This step checks whether the column UD_MSEXCHG_OBJECTUID got set or not in step 2, if got set then proceed to step 4.
4) Create Mailbox.
As what we have stated above, the most important part of provisoning exchange account is getting objectGUID from AD process, which is step 2, so we need to discuss more about step 2, actually, step 2 needs to know the user key and IT resource key as a parameter for the query below:
*****************************************************************************
select distinct UD_ADUSER.UD_ADUSER_OBJECTGUID from UD_ADUSER UD_ADUSER, orc orc ,sta sta where UD_ADUSER.orc_key=orc.orc_key and orc.usr_key=2662 and UD_ADUSER.UD_ADUSER_AD=161 and orc.orc_status=STA.sta_status AND STA.sta_bucket != 'Cancelled'
****************************************************************************
Parameters:
-----------------------------------------
a. 2662 is a user Key in USR table.
b. 161 is a IT Resource Key in table SVR.
Explain how the get param a and b
(1) For user key, get be actually get from ORC (process table), as ORC has user key column, beside UD_MSEXCHG table has ORC_KEY column as well, that how be get user key,
(2) For IT Resource key, this is very obviously, UD_MSEXCHG has a column of AD IT Resource, UD_MSEXCHG_ADSERVER.
-----------------------------------------
Result
-----------------------------------------
UD_ADUSER.UD_ADUSER_OBJECTGUID
87e1bf040c85ba49b3d57ce9b4c38ec8
-----------------------------------------
How to solving the problem stated as the title of this article
If you can not get object GUID from UD_ADUSER table, and you confirmed that the corresponding AD account record in UD_ADUSER table has objectGUID, then the problem probably is that you use different AD IT Resource for AD User and Exchange,
e.g. You use ADITResource_DEV for AD User, but ADITResource for Exchange, and the key for ADITResource_DEV is 161, but the key for ADITResource is 1,
AD User - ADITResource_DEV - 161
Exchange - ADITResource - 1
so when you create exchange account, you will be executing the SQL below:
select distinct UD_ADUSER.UD_ADUSER_OBJECTGUID from UD_ADUSER UD_ADUSER, orc orc ,sta sta where UD_ADUSER.orc_key=orc.orc_key and orc.usr_key=2662 and UD_ADUSER.UD_ADUSER_AD=1 and orc.orc_status=STA.sta_status AND STA.sta_bucket != 'Cancelled'
Then you won't get any result, because corresponding AD User account in UD_ADUSER table has a key of ITResource key (UD_ADUSER.UD_ADUSER_AD) equals to 161, not 1 , that's the reason why you get not get object GUID from AD USER Table.
Sunday, December 13, 2009
About Auto Save in OIM
About Auto Save in OIM
1. Make Resource Object Auto Save, if you don't want user's intervention with Object
form.
Note: Make sure object form has no mandatory fields, otherwise, you will not be able
to make resource object Auto-Saved.
2. Make Process ( normally provisioning process) Auto Save, if you don't user
to modify process form.
3. Make a Access Policy with approval, Add tcCompleteTask for "Awaiting Object Data"
process task, Add tcCompleteTask for process task "Approve".
once the policy is made, the approval process for the resource of that policy starts,
If User did not set Resource Object to Auto Save, then the approver will
not be able to see the "request". So set Object to Auto-Save.
4. Besides setting Object to Auto Save, we also need to make sure all the compulsory
field of that Object form has prepopulated or default value, So that
Approver will be able to See the "Request".
******** Actually, If the object form got compulsory field, then It can not be
Auto-saved.
5. If did above items correctly, the approver will be able to receive the requst,
and modify the object form, then approve or deny that request.
6. About Process Form Auto-Save.
If you have mandatory (required) field in your form, and you want your form to be
auto-saved, you must ensure that all the mandatory field either has prepopulated
value or default value.
e.g.
You have a process named "Exchange Request", and you have an process form associated
with it, called "UD_EXCHG", and this process form has a mandatory field call "Email
Alias".
In this case, if you want to make process "Exchange Request" Auto-saved, you must
either prepopulate value or using default value, so that the Auto-Save check box
on process "Exchange Request" is functioning correctly.
In conclusion, If you prepopulate value or set default value for process value, then
The Auto-Save feature of process works perfectly.
7. About Object Form Auto-Save.
If the object form got compulsory field, then It can not be Auto-saved.
In order to prove it, I made a test:
I got one compulsory field, and I set default value for it, then I make the resource
object auto-saved, However, It turned out the request resource process took me to
the object form -------------- Weird!!!!!!
e.g.
You have a Object named "Exchange Request", and you have an object form associated
with it, called "UD_EXCH_OB", and this obect form has a mandatory field call "Email
Alias".
So If you want to make this object "Exchange Request" auto-saved, you'd better make
all the form not compulsory!!!, meaning make "Email Alias" a normal non-compulsory '
field.
*********
Note that:
If the Object Form got "password" field, even you can make the auto-save works, you
will never get pass the submit request, ---- a every strange exception will be
thrown, saying that you could not save the request, and you can get any database
connections ---------------------------
***********
Solution for password synchronization.
You want to synchronize password between OIM and target resource, and you also want
to make object form auto-saved, the only way to do is to following the precedure
below:
1) Remote Password Field from Process Data Flow Mapping.
2) Remove Password Field and its "prepops" from Object Form.
3) Add Password Prepop for the corresponding Process Form.(push data from user
definition)
In This way, User OIM password could be successfully synchronize to target resource.
Note: please make sure object form has no compulsory field, otherwise, you won't be
able to auto-save object form during request.
Monday, December 7, 2009
OIM Service Account vs Normal Account
OIM Service Account vs Normal Account
1. Service Account
Events:
Service Account Alert
Service Account Changed
Service Account Moved
2. Normal Account
Triggers:
Lookup.USR_PROCESS_TRIGGERS
We can configure trigger for normal account, so that resource profile
shall be changed upon OIM profile changed.
e.g.
Code Decoded
USR_PASSWORD - Change User Password
We add "Change User Password" as a process task name to process definition,
once USR_PASSWORD is changed in OIM Account, the process task:
Change User Password shalled be triggerd to run!
3. Differences:
the trigger: Lookup.USR_PROCESS_TRIGGERS has no effects to Service Account!
and
the Service Account Event won't be triggered for normal account.
4. More Explain on Service Account Event:
Service Account Alert - Triggered when target service account's Owner's OIM
account is disabled or deleted.
Service Account Changed - Triggered when service account Changed,
e.g. From Regular Account To Service Account, or From Service Account To Regular
Account.
Service Account Moved - Triggered when service account's owner is changed.
5. Use Service Account Event to Update Target Resource ProfileThis is an example:
a). We defined process task "Change Description" in service account provisioning process. This task changes the process data "Description"
b). We defined process task "Change Group Owner ID", This Task changes the process
data "Group Owner ID".
c). We configured "Service Account Alert" in that process.
d). we set "Tasks to Generate" of "Change Description" and "Change Group Owner ID"
for response "true" of process task : "Service Account Alert", so that the tasks that
we defined in step a and b will be triggered once "Sercie Account Alert" task is
completed, meaning right after service account ownership is tranfered.
e). then we disable User OIM account, the "Service Account Alert" task will be
triggered, after that "Change Description" and "Change Group Owner ID" runs after
because the owner has been changed.
Saturday, December 5, 2009
OIM910 - Process Event
Reconciliation Events
Reconciliation Insert Received
Reconciliation Update Received
Reconciliation Delete Received
Service Account Alert
Service Account Alert
Service Account Changed
Service Account Moved
Field Updated Event
Use "Field Label Name + Updated" as the process task name so that this process task will become an field updated event, meaning if we update that Field, this process task will be called. e.g. We have Label "Group Name" in Process From "UD_ADGRP", if we create a process task in "AD Group" (Process Name), called "Group Name Updated", it will be triggering by Group Name field update event.
Enable and Disble Event
When we create process task we can assign the Task Effect as "Disable Process or Access to Appiction" or "Enable Process or Access to Application".
"Disable Process or Access to Appiction" triggers by Disable button of Resource Profile page and User Detail page.
"Disable Process or Access to Appiction" triggers by Disable button of Resource Profile page and User Detail page.
So If user click either of button, the corresponding event will be triggered.
More Explain on Service Account Event:
Service Account Alert - Triggered when target service account's Owner's OIM
account is disabled or deleted.
Service Account Changed - Triggered when service account's owner is changed.
Service Account Moved -
OIM910 - How to use lookup query
The example I am taking here is to have a lookup from a custom table "access_table" containing three
columns access_id, descritption and groupname (this is the column stating which group has access to which
switch)
Steps to follow:
1. Mandatory properties to specify are :
a) Lookup Query e.g.
select distinct a.access_id, a.description from access_table a, usg b, ugp c, usr d where c.ugp_name =
a.group_name and b.ugp_key = c.ugp_key and b.usr_key = d.usr_key and d.usr_status ='Active' and d.USR_LOGIN
= '$Requester Information.User Login$'
b) Column captions e.g. Access ID, Description
This will ensure that in the lookup table displayed in UI will have two columns Access Id and description.
c)Columns names e.g. ACCESS_ID,DESCRIPTION, these are the columns specified in the select query.
ACCESS_ID AND DESCRIPTION must have its own lookup code, otherwise it can not be inserted as
columns names, so let's say ACCESS_ID AND DESCRIPTION have their lookup code shown below:
code : Users.UDF.Access_id
field: ACCESS_ID
lookup type: field type
code: Users.UDF.DESCRIPTION
field: DESCRIPTION
lookup type: field type
In order to make the lookup query work, we need to the corresponding lookup filed in
"xlWebAdmin.properties",
otherwise, the pop-up window(lookup window) will not show captions and values!
===================================================================================
lookupfield.header.users.udf.access_id=Access ID
lookupfield.header.users.udf.description=Description
===================================================================================
Noted the captions have been converted to LOWER CASE and BLANK SPACE has been repaced with "-". Put in
section "LOOKUPFIELD column headers".
The LOOKUP FILED HEADER IS BASED ON LOOKUP CODE! NOT THE COLUMN NAME.
d) Lookup column name e.g. ACCESS_ID, this is the column that is put in the textfield associated with
lookup field.
e) Column widths e.g. 25,100 This is the column width in table
Friday, November 20, 2009
OIM910 - Exchange 2007 Connector Create Mailbox Fail
OIM910 - Exchange 2007 Connector Create Mailbox Fail
I have OIM 9.1.0 installed, and I am using Exchange Connector 9.1.0, and I configured my exchange IT Resource to use Remote Manager, and I did the following steps to create mailbox.
1. Provision AD User account to OIM User.
2. Once I created the AD account, then I provision exchange 2007 account with the remote manager up, but I failed to create mailbox.
Here is the procedure how exchange connector create mailbox.
1. first it check if the mailbox is already present in the Exchange.
2. If it is not present then it execute the scripts createmailboxexchange2007.vbs script using the remote manager.
3. It then again checks if the mailbox is created.
The error log as shown below:
"DEBUG,19 Nov 2009 14:01:19,977,http://OIMCP.MEXC,com.thortech.xl.integration.Exchange.tcExchangeTasks : checkMailboxCreation : No value for homeMDB fetched
INFO,19 Nov 2009 14:01:19,978,http://OIMCP.MEXC,com.thortech.xl.integration.Exchange.tcExchangeTasks : checkMailboxCreation : Unable to execute the Power Shell command"
So basically step2 was failed, so in step 3, can not get attribute homeMDB, if step 2 succeed, in step3 , OIM should be able to get attribute value for homeMDB, as for now, I believe something wrong with the script "CreateMailboxExchange2007" .
Here is what I did on the remote manager host machine.
I manually execute the script "CreateMailboxExchange2007", and It worked!
so there is nothing wrong with the script, so I begun to believe there was something wrong with the Java and powershell, below are my spec for java and powershell.
Java: jdk-6u17-windows-i586 ---- 32bit
Powershell: WindowsServer2003.WindowsXP-KB926139-v2-x64-ENU ---- 64bit
OS: Window Server 2003 x64 Enterprise Edition
So I think the problem might be 32bit and 64bit powershell can not work together,
So I installed 64bit java (jdk-6u17-windows-x64) instead, and It turned out to be working an fix the problem.
Just for your information, below are a java program which can create mailbox with the help of "CreateMailboxExchange2007.vbs"
import java.io.*;
public class RunScript {
public static void main(String [] args){
try {
//String cmd ="cmd /c C:\\oracle\\xlremote\\scripts\\CreateMailboxExchange2007.vbs";
//String cmd ="C:/oracle/xlremote/scripts/CreateMailboxExchange2007.vbs";
String cmd ="C:\\oracle\\xlremote\\scripts\\CreateMailboxExchange2007.vbs test5@celcomdev.ad \"Mailbox Database\" \"C:\\oracle\\xlremote\\log\\Report.log\"";
//String cmd="PowerShell.exe -PSConsoleFile C:\Program Files\Microsoft\Exchange Server\Bin\exshell.psc1 -noexit ""&{""Enable-Mailbox test4@celcomdev.ad -Database \'Mailbox Database\'\;\exit 0\} >> \'C:\oracle\xlremote\log\Report.log\'";
//String cmd = "C:\\WINDOWS\\system32\\WindowsPowerShell\\v1.0\\PowerShell.exe -PSConsoleFile \"C:\\Program Files\\Microsoft\\Exchange Server\\bin\\exshell.psc1\" -noexit & {\"Enable-Mailbox test4@celcomdev.ad -Database \'Mailbox Database\'\";\"exit 0\"} >> \'C:\\oracle\\xlremote\\log\\Report.log\'";
//String cmd = "cmd /c powershell C:\\Program Files\\Microsoft\\Exchange Server\\bin\\exshell.psc1 & {\"Enable-Mailbox test4@celcomdev.ad -Database \'Mailbox Database\'\"}";
//String cmd = "PowerShell.exe -PSConsoleFile \'C:\\Program Files\\Microsoft\\Exchange Server\\bin\\exshell.psc1\' -noexit -command \". \'C:\\Program Files\\Microsoft\\Exchange Server\\bin\\Exchange.ps1\'; Enable-Mailbox test4 -Database \'Mailbox Database\'";
//String cmd = "PowerShell.exe -PSConsoleFile \"C:\\Program Files\\Microsoft\\Exchange Server\\bin\\exshell.psc1\" -noexit -command \". \'C:\\Program Files\\Microsoft\\Exchange Server\\bin\\Exchange.ps1\'; Enable-Mailbox test4 -Database \'Mailbox Database\'";
//String cmd = "C:\\Program Files\\Microsoft\\Exchange Server\\bin\\Exchange.ps1 Enable-Mailbox -Identity test4 -Database \'Mailbox Database\'";
//String cmd = "cmd /c mkdir test2";
File file = new File("C:\\oracle\\xlremote\\scripts\\CreateMailboxExchange2007.vbs");
if(!file.exists())
{
System.out.println("File not existed.");
}
Runtime runtime = Runtime.getRuntime();
Process process = runtime.exec("cscript.exe " + cmd);
//Process process = runtime.exec("cmd /c " + cmd);
//Process process = runtime.exec( cmd );
int i = process.waitFor();
InputStream inputstream = process.getInputStream();
InputStreamReader inputstreamreader = new InputStreamReader(inputstream);
BufferedReader bufferedreader = new BufferedReader(inputstreamreader);
String line;
PrintWriter printwrite = new PrintWriter(new FileWriter("test.txt", true));
while ((line = bufferedreader.readLine()) != null) {
System.out.println(line);
printwrite.println(line);
}
printwrite.close();
process.getOutputStream().close();
String response = i != 0 ? "EXCHANGE.REMOTE_SCRIPT_RUN_SUCCESS" : "EXCHANGE.REMOTE_SCRIPT_RUN_FAILURE";
System.out.println(response);
} catch(Exception ex) {
ex.printStackTrace();
}
}
}
=============================================================
Useful link to get started with Using powershell to administrate Exchange 2007
http://www.exchangeninjas.com/PSSCategories
Thursday, November 12, 2009
How OIM profile update trigger works.
How OIM profile update trigger works.
As you know the trigger lookup code is Lookup.USR_PROCESS_TRIGGERS ,
and a series of OIM USER attributes and process name mappings are
stored in this lookup code.
For Example,
We have a mapping as shown below:
USR_UDF_GROUP ---> Change User Group
so we have an user defined field "group" for OIM profile.
we aleady add process task "Change User Group" to AD User Process as
a conditional task.
we have created an adapter task, say getUserGroup, this adapter task
simple grab user group information from OIM profile (user definition data),
getUserGroup:
attribute: userGroup
return:userGroup
then what we do is to add this adapter to process task "Change User Group",
map attribute userGroup to user definition data "group", and map the adapter
return value to process data attribute "organization name".
As a result, once user changes his/her OIM profile attribute "group", process task
"Change User Group" will be triggered to run, after that, process task
"Organization Name Updated" runs afterward.
Summary: we use "Change User Group" task to convert user definition data "group" to
process data "Organization name", since we updated attribute "group" of OIM profile,
its mapped attribute "Organization name" will be triggered to run, as a result, AD user's
organization name will be updated.
Friday, November 6, 2009
Adapters
Adatpers can be classified as below:
- Process Task
- Rule Generator
- Pre-populate Rule Generator
- Entity
- Task Assignment
To enable the adapter to automate a process task, select Process Task (T)
To incorporate business rules into an Oracle Identity Manager or user-defined form field, select Rule Generator (R)
example, for the User ID field of a form, you can configure Oracle Identity Manager to concatenate the initial letter of the user's first name with the user's last name.
You can attach a type of rule generator adapter to a user-created form field, so that it can:
◦Display the data, which is generated by the adapter, automatically or manually.
◦Use criteria that enable Oracle Identity Manager to determine which adapter is applied to the designated form field.
To attach the adapter to an Oracle Identity Manager or user-defined form field, and have Oracle Identity Manager trigger the adapter on preinsert, preupdate, predelete, postinsert, postupdate, or postdelete, select Entity (E).
To allow the adapter to automate the allocation of a process task to a user or group, select Task Assignment (A).
Thursday, November 5, 2009
Resource Object Process and Forms
Summary:
A Resource Object defines a resource in Identity Management System, and each resource object has several process associated with it, and one of the process is configured to be the default process for that resource object, moreover, a process can be associate with a from which helps process to collect data that will be used by the process tasks of that process.
Resource Object
Resource object definitions are templates for provisioning the resource. However, the approval and provisioning of the resource depends on the design of the approval and provisioning processes that you link to the resource object.
Process
A process is the mechanism for representing a logical workflow for approvals or provisioning in Oracle Identity Manager. Process definitions consist of tasks. Process tasks represent the steps that you must complete to fulfill the purpose of a process.
In an approval process, the tasks can represent individual approvals that are required for an action to take place.
In a provisioning process, tasks are used to enable a user or organization to access the target resource.
Form
From is the object that collects user inputs and make the inputs available to the process that the form is associated with.
Child From
We have already known that froms is meant to be associated with process, and the data that from collects will be available to the process tasks within that process.
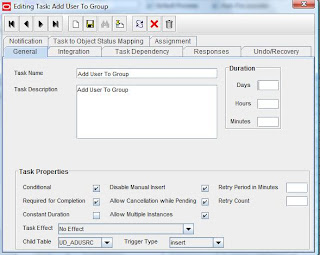
For example, AD User From(UD_ADUSER) has a child form AD User Group Details(UD_ADUSRC). AD User Form is used to provision AD resource to OIM user, and AD User Group Detail form is used to assign AD user to specific AD group object as a member, thus there are actually two froms are associated with AD User process which is the default process for resource object AD User, then now the question is how the process tasks behaves after we submit AD User form with data filled in its child form AD User Group Detail from (where we select group from AD User). Once we submit that form to provision a AD account, all the unconditional tasks will be triggered to run, as well as the process tasks which has its child table attribute set to UD_USRC and trigge type to "insert" will be triggered to run also, for example the "Create User" process task which is unconditional, so it will be triggered to run, as well as process task "Add User To Group" will be triggered to run also, as is child table trigger type is "insert".
A Resource Object defines a resource in Identity Management System, and each resource object has several process associated with it, and one of the process is configured to be the default process for that resource object, moreover, a process can be associate with a from which helps process to collect data that will be used by the process tasks of that process.
Resource Object
Resource object definitions are templates for provisioning the resource. However, the approval and provisioning of the resource depends on the design of the approval and provisioning processes that you link to the resource object.
Process
A process is the mechanism for representing a logical workflow for approvals or provisioning in Oracle Identity Manager. Process definitions consist of tasks. Process tasks represent the steps that you must complete to fulfill the purpose of a process.
In an approval process, the tasks can represent individual approvals that are required for an action to take place.
In a provisioning process, tasks are used to enable a user or organization to access the target resource.
Form
From is the object that collects user inputs and make the inputs available to the process that the form is associated with.
Child From
We have already known that froms is meant to be associated with process, and the data that from collects will be available to the process tasks within that process.
For example, AD User From(UD_ADUSER) has a child form AD User Group Details(UD_ADUSRC). AD User Form is used to provision AD resource to OIM user, and AD User Group Detail form is used to assign AD user to specific AD group object as a member, thus there are actually two froms are associated with AD User process which is the default process for resource object AD User, then now the question is how the process tasks behaves after we submit AD User form with data filled in its child form AD User Group Detail from (where we select group from AD User). Once we submit that form to provision a AD account, all the unconditional tasks will be triggered to run, as well as the process tasks which has its child table attribute set to UD_USRC and trigge type to "insert" will be triggered to run also, for example the "Create User" process task which is unconditional, so it will be triggered to run, as well as process task "Add User To Group" will be triggered to run also, as is child table trigger type is "insert".

Sunday, September 13, 2009
How to generate a keypair
How to generate keypair by using keytool
The following command generates a keypair which will valid for 20 years .
C:\>keytool -genkeypair -alias test -validity 7200 -keystore teststore -storepass passw0rd -keypass passw0rd -dname "cn=test, ou=test, o=test, l=test, st=test, c=test"
The keystore
2. Export public key certificateExport.
The following command exports the public key certificate that we hava just generated in step 1:
C:\>keytool -exportcert -alias test -keystore teststore -storepass passw0rd -file testcert.cer
Certificate stored in file
You'll find the public key certificate named testcert.cer in current working directory
3. Import public key certificate to keystore
The following command imports the public key certificate to keystore
C:\>keytool -import -trustcacerts -alias testtrusted -keystore teststore -storepass passw0rd -file testcert.cer
Certificate already exists in keystore under alias
Certificate was added to keystore
4. View keystore details:
C:\>keytool -list -v -keystore teststore -storepass passw0rd
Keystore type: JKSKeystore provider: SUN
Your keystore contains 2 entries
Alias name: testtrustedCreation date: Sep 13, 2009Entry type: trustedCertEntry
Owner: CN=test, OU=test, O=test, L=test, ST=test, C=testIssuer: CN=test, OU=test, O=test, L=test, ST=test, C=testSerial number: 4aacbeadValid from: Sun Sep 13 17:43:09 SGT 2009 until: Thu May 31 17:43:09 SGT 2029Certificate fingerprints:
MD5: CC:4B:EC:BD:10:F0:B0:8E:39:01:B9:C7:54:81:6B:76
SHA1: 3F:5E:48:94:D4:78:F4:4D:FC:8F:64:86:7E:87:7B:AE:4B:D0:C4:7F Signature algorithm name: SHA1withDSA Version: 3
**************************************************************************************
Alias name: testCreation date: Sep 13, 2009Entry type: PrivateKeyEntryCertificate chain length: 1Certificate[1]:Owner: CN=test, OU=test, O=test, L=test, ST=test, C=testIssuer: CN=test, OU=test, O=test, L=test, ST=test, C=testSerial number: 4aacbeadValid from: Sun Sep 13 17:43:09 SGT 2009 until: Thu May 31 17:43:09 SGT 2029Certificate fingerprints: MD5: CC:4B:EC:BD:10:F0:B0:8E:39:01:B9:C7:54:81:6B:76 SHA1: 3F:5E:48:94:D4:78:F4:4D:FC:8F:64:86:7E:87:7B:AE:4B:D0:C4:7F Signature algorithm name: SHA1withDSA Version: 3
**************************************************************************************
PrivateKeyEntry will be used for server to establish ssl communication, while trustedCertEntry will be used for certificate
validity checking during ssl handshake. to be clearly, the public key certificate from PrivateKeyEntry will be sent from server
to client during ssl handshake, then client will verify that certicate against its trusted keystore, if client find that
certificate or its root certicate is already in its trusted keystore, then the client will say the server is trusted, then a SSL
session will be established.
Subscribe to:
Comments (Atom)